Sometimes it makes more logical sense to show your placeholders in your fields than to use field labels. Sometimes it looks prettier. Sometimes it works better with your design. So, when you are using SharpSpring forms, how do you display placeholders instead of field labels?
Not sure what I’m talking about?
Let’s do a quick rundown on what’s what.
Field Labels
Field labels are in essence the name of the field. They are usually short and indicate what data should go in that field. Common examples are: First name, Last name, Phone number, Email address, etc
Field Placeholders
Field placeholders are the content that is pre-loaded inside a field. Placeholders are often used as an example answer to give users a better picture of what should go in the field or the formatting to use. As an example, a placeholder for “Phone number” might be “+61 234 567 890”. Placeholders disappear as soon as the user starts typing into the form field, enabling them to fill in their own answers.
Field placeholders provide valuable information to help streamline the user experience, however, for simple forms that have common, self-explanatory fields, the placeholder may not be necessary and could instead be used in place of the field label to improve the appearance of the form.
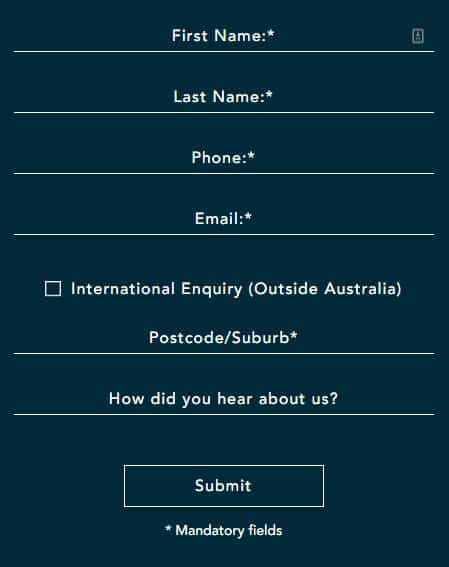
Here is an example of a form that uses placeholders instead of field labels. For this particular website, using just the field placeholders instead of field labels helps to keep the form concise and it fits much better with their website style.

Displaying Placeholders in SharpSpring
By default, SharpSpring forms do NOT display placeholder text. They only show field labels.
Right now, there is no way to enable placeholders in the visual editor. Instead, you have to modify the embed code. Your SharpSpring form embed code will look something like this by default:
<!-- SharpSpring Form for Example -->
<script type="text/javascript">
    var ss_form = {'account': 'example', 'formID': 'example'};
    ss_form.width = '100%';
    ss_form.height = '1000';
    ss_form.domain = 'app-example.marketingautomation.services';
    // ss_form.hidden = {'field_id': 'value'}; // Modify this for sending hidden variables, or overriding values
    // ss_form.target_id = 'target'; // Optional parameter: forms will be placed inside the element with the specified id
    // ss_form.polling = true; // Optional parameter: set to true ONLY if your page loads dynamically and the id needs to be polled continually.
</script>
<script type="text/javascript" src="https://example.marketingautomation.services/client/form.js?ver=2.0.1"></script>
In order to enable placeholders, you need to enable and modify the ss_form.hidden variable.
This means removing the // at the start of the line to enable it (a // means that everything that follows on that line of code is a comment and should not be processed, by removing the // you allow the code to be processed), and adding the appropriate command to enable placeholders.
It should look like this:
ss_form.hidden = {'_usePlaceholders': true};So your new embed code will look something like this:
<!-- SharpSpring Form for Example -->
<script type="text/javascript">
    var ss_form = {'account': 'example', 'formID': 'example'};
    ss_form.width = '100%';
    ss_form.height = '1000';
    ss_form.domain = 'app-example.marketingautomation.services';
    ss_form.hidden = {'_usePlaceholders': true};
    // ss_form.target_id = 'target'; // Optional parameter: forms will be placed inside the element with the specified id
    // ss_form.polling = true; // Optional parameter: set to true ONLY if your page loads dynamically and the id needs to be polled continually.
</script>
<script type="text/javascript" src="https://example.marketingautomation.services/client/form.js?ver=2.0.1"></script>
Your form will now be displaying placeholders inside the fields. By default, SharpSpring uses the field label for the placeholder text.
What about the field labels?
Your field labels will still be displayed as well though, meaning you might have the same text twice, once in the field label and once in the placeholder. You can’t turn off the field labels, but you can hide them. In order to hide the field labels, you will need to add a little bit of CSS to the stylesheet you use for your form.
How to hide your field labels in SharpSpring forms
In order to hide the field labels on a SharpSpring form, you must first be using a custom stylesheet for that form.
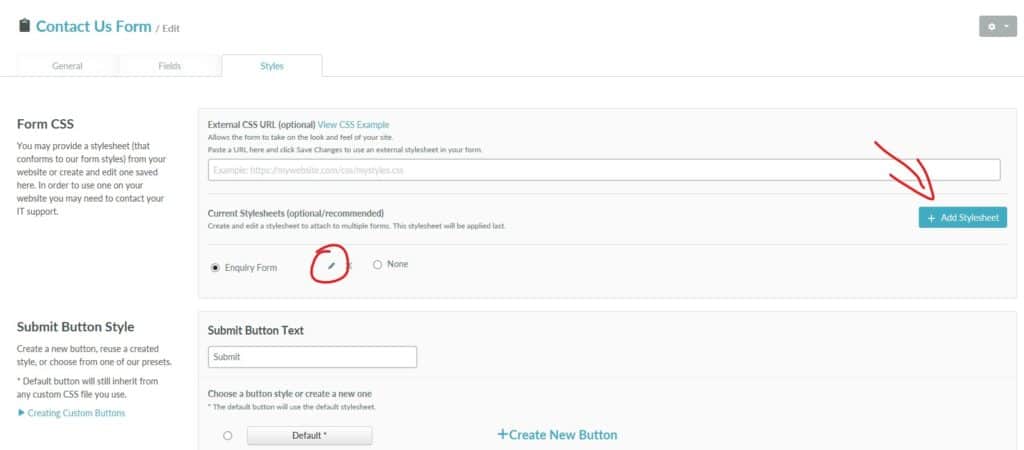
To edit the custom stylesheet, or add one, first edit the form in question and go to the “Styles” tab.
If you are using a custom stylesheet, hover over the name so the edit icon appears (a little pencil). Click the edit icon to open the stylesheet editor. See the screenshot below for where to find the icon.
If you aren’t already using a custom stylesheet, click the blue “Add Stylesheet” button in the top right of the screen to add a new custom stylesheet that is pre-filled with common code.

In either case, the CSS editor will appear. You will need to insert the code snippet below to hide the field labels. If you aren’t sure where to put it, I would suggest scrolling to the very end of the code and pasting this snippet in as a new line. That way you don’t accidentally mess up anything else in the code that is already there.
label { display: none; } This code will hide the labels for all fields. Please do be aware though that there may be some fields that you still need labels for. Checkbox or radio button fields are a good example. If this is the case, you would use this code instead:
label:not(.checkbox-label) { display: none; }
Depending on how complex your form is, it may take a little bit of work to ensure the field labels are displaying for the fields you want. If you need help with this, please, get in touch.
Assuming all went to plan, your form should now be displaying placeholders only and no field labels.
Can I change my custom field placeholders?
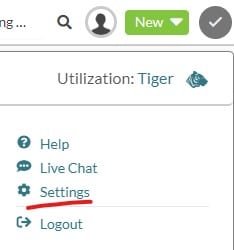
Yes, you can. This is NOT done in the SharpSpring form editor though. To edit custom field placeholders, you need to go to your field settings. This is usually at myaccount.marketingautomation.services/settings/fields or click the little user icon in the top right of SharpSpring and then select “Settings”.

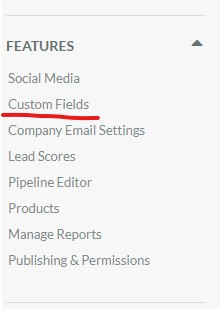
You will find custom fields under the “Features” heading.

Edit the desired field and you will see the “Field Label” at the top of the screen. Below the field type selection you will see the “Placeholder” box. Type your custom placeholder into this field.

Please note, you will need to have the appropriate permissions to edit custom field settings.
Need more help?
Having trouble with your SharpSpring form stylesheets or appearance? Want to get started with the SharpSpring CRM? We can help! We have a great deal of experience in setting up custom forms, form fields, stylesheets and general usage of the SharpSpring platform. Why not work with us today and get more from your SharpSpring investment.


