Do you struggle to get customers to leave product reviews on your WooCommerce store? Do you wonder how other stores seem to get hundreds, if not thousands of reviews? It’s tough, I know, and we used to build out our own way of asking for reviews, but it was complex and required a lot of manual intervention. There is an easier way though. In this article, I’ll show you how to get more customer reviews for your WooCommerce store using an entirely automated process. Once this process is setup, everything happens automatically and the reviews will start pouring in. We typically see review’s submitted at a rate of just over 50% on average using this process. So for every 100 orders, that’s more than 50 reviews. That’s huge! There is no guarantee you will get the same conversion rate, but with possibilities that high, it’s a no brainer to me.
So, are you ready to learn how to get more product reviews coming into your WooCommerce store automatically? We’re going to use one of the plugins I mentioned in my list of essential WooCommerce plugins. Which one? “Customer Reviews for WooCommerce“. Shortened to Customer Reviews, CusRev or CR, this plugin is my favourite tool for automating the customer review process in WooCommerce and makes the whole process super easy. In this article, I’m not going to go into all of the advanced features available in CusRev, but rather just focusing on how to get the plugin setup so that you increase the volume of reviews you are receiving by using an automated process.
Prefer to learn in video form? Check out my video guide:
Already have CusRev installed and want to display the product and store reviews in other places around your website? Check out our blog post: How to insert CusRev customer reviews around your WooCommerce store
Install the Customer Reviews for WooCommerce plugin
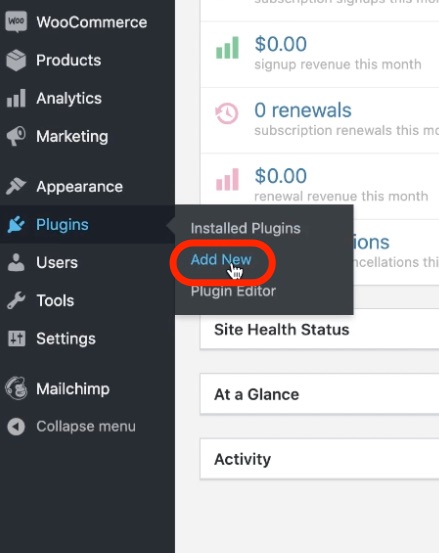
To get started head into your WordPress dashboard, go to your plugins and click “Add New”.
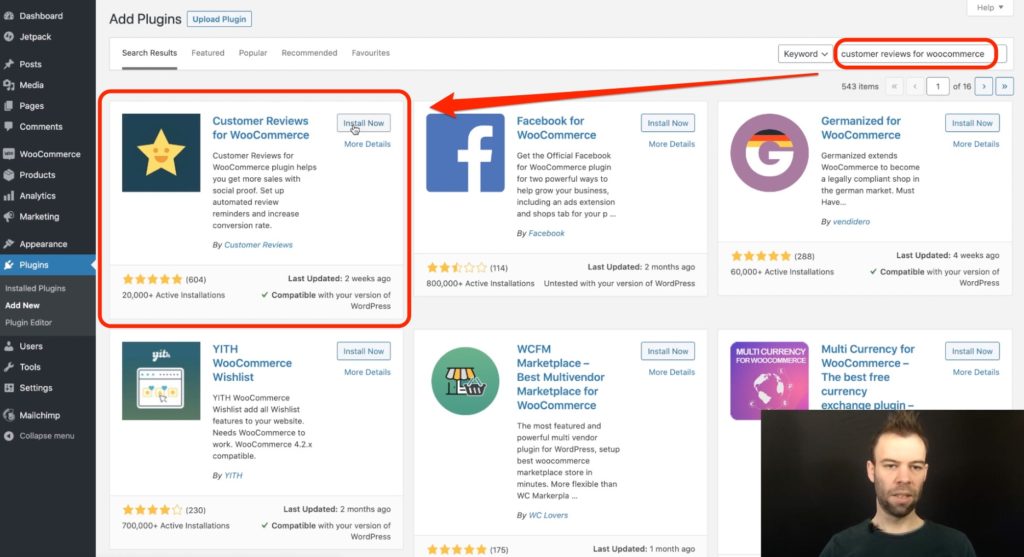
Search for “Customer Reviews for WooCommerce” and install the plugin.
Once the plugin is installed, press the blue activate button.
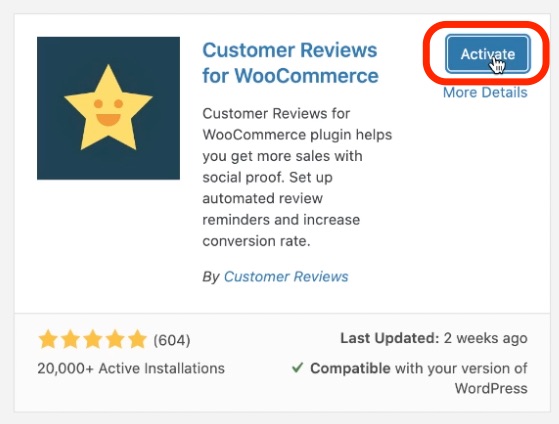
It will add a reviews menu on the sidebar that you can use to access settings, reviews and other features in the future.
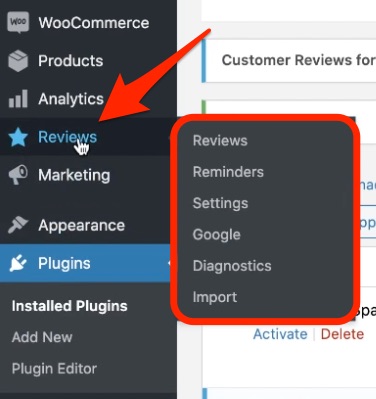
Configure the Customer Reviews for WooCommerce plugin
Right now, you’ll see a prompt at the top of the screen to set up the plugin. Press that settings link and it will take you straight to the CusRev settings screen. If you don’t see the prompt, you can also get there again by going to reviews and settings in the sidebar.

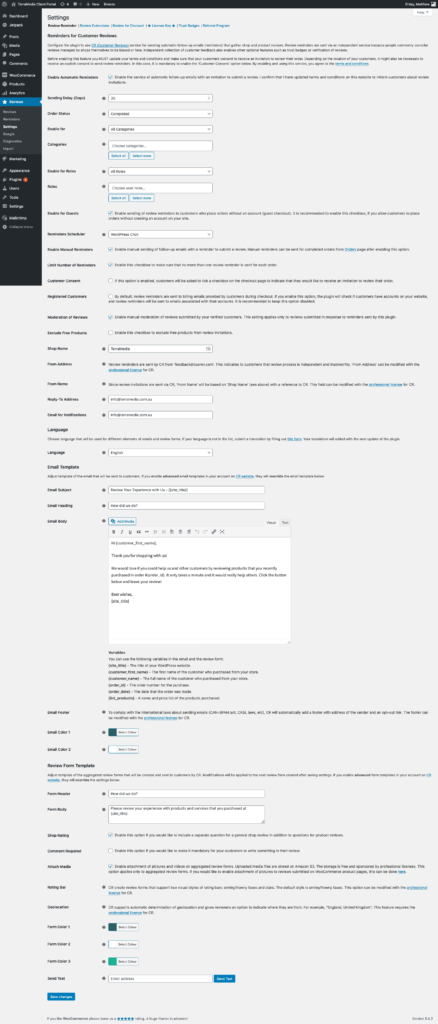
The settings screen is quite straightforward. I know there are a lot of options here and it looks like there’s an awful lot. That can be overwhelming, but I promise it isn’t.
This first settings screen is all you need to configure in order to get things running. Once we are done here, you’ll be starting to receive reviews from your WooCommerce store customers automatically. Don’t worry about any of the others for now. They give you access to some really cool features and I’ll cover them in future articles, but they aren’t necessary for right now. So, let’s get you up and running and getting your reviews coming in automatically.
Update your website terms and conditions
First up, you will see a prompt at the top of the screen about updating your website terms to ensure that customers understand that they are consenting to receive an invitation to leave a review. It’s important that you do this!

Enable Automatic Reminders
Once you have updated your terms, enable automated reminders.

Tick that box if it’s not ticked.
Configure your sending delay
Choose a sending delay. I like 30 days. I think that’s a great time period to give your customers plenty of opportunity to actually use your product after it’s been delivered.

Choose what order status to enqueue reminder emails on
Set your order status to “Completed” to make sure the order has actually been marked as complete before the reminder is scheduled. You can also enqueue the reminder emails to schedule on the “Processing” status if you prefer, but I recommend “Completed”.

Choose what WooCommerce product categories to collect reviews for
You can enable review reminders for all categories or just for specific ones.

If you choose to go with specific categories, you can then select them from the list below.

I would leave it to all categories to maximise your reviews, but there may be a reason you don’t want reviews on certain products. If so, this gives you a way to exclude them.
Choose what user roles in your WooCommerce store should receive review reminders
You can configure role restrictions to either allow all roles or only specific roles such as your customer role.

If you opt to only send reminders to specific user roles, you can select the roles from the roles box.
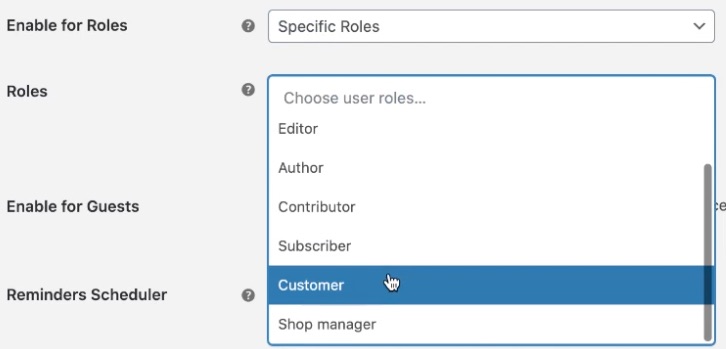
Enable sending customer review reminders to guests
You can choose to enable whether you want review reminders to be sent to customers who have checked out via the guest checkout.

I usually leave this on as I want to capture reviews from as many customers as possible and not just from those who have created accounts. If you require your customers to create accounts in order to make a purchase then you wouldn’t need to use this.
Configure what cron to use for scheduling review reminder emails
Now, your customer review reminder scheduler. This is the backend process that is used to send out review reminders at the appropriately scheduled intervals. You can choose either your built-in WordPress cron or you can use the Customer Reviews cron.

To use the Customer Reviews cron you need to sign up to Customer Reviews via their website and get a free license key. Since that is outside the scope of this main settings screen, we’ll use the built-in WordPress cron.
Enable manual customer review reminders to be sent to your WooCommerce customers
Do you want to enable manual reminders? This enables sending review reminders out by pressing a button instead of waiting for the scheduled reminder to be sent automatically. If you want to be able to do this, tick this box. I usually do because it lets me send review reminders for orders that were completed prior to enabling Customer Reviews for WooCommerce. If you do this, make sure to only send them to people who purchased AFTER you added the relevant clause to your store terms and conditions. Enabling manual customer review reminders in WooCommerce also lets me manually send them out if I need them to get at a different time for some reason.

Limit how many review reminder emails that Customer Reviews can send out
Do you want to limit the number of reminders that are sent out?
I do because I don’t like to annoy people with lots and lots of reminders.
Ticking this box will only send your customers one reminder for each order, ever.

Ask your customers for permission to email them a review invitation
The customer consent checkbox adds a little tick box at the checkout where your customers are asked if they would like to receive an invitation to leave a review for your products after their order is completed. I usually leave this off, but if you want to allow your customers to opt-in to receiving the reminder, or it is mandatory to receive consent in the countries you operate, you can enable this.

Send review reminder emails to the registered customer email instead of the billing email
The registered customers option allows you to choose whether to send reminders to the customer account email instead of the billing email on the order.

Normally, I would leave this as the billing email.
Enable customer review moderation
Moderation of reviews allows you to check the reviews before they’re published on your website. They appear in WordPress like pending comments waiting for you to approve them.

It’s up to you to decide if this is necessary or not. Enabling it reduces the amount of automation since you now have to manually check and approve your customer reviews. I usually do enable this, just in case customers include information in their reviews that is personally identifiable or completely inappropriate.
Keep in mind, that you should never substantially edit reviews, and, any edits you make don’t change the review that appears on the Customer Reviews website, only what is shown on your store. You don’t want to be caught out trying to edit reviews, so only use this when absolutely essential.
Exclude free products from customer review reminder emails in WooCommerce
Do you want to exclude free products from review invitations? If so, tick this box. If you don’t have any free products, you can completely ignore this option.

Define your WooCommerce shop name
Define your shop name. By default, this will be pulled from your WordPress site name. You can change it here though if you wish. This is the name that is used in emails sent out by CusRev, on the review form, and anywhere else within either of those locations that you use the {site_title} variable (explained later).

Set your email from address (pro license only)
The from address is the email address used to send the review reminder email to your customers.
You can’t change the from email in the free version you can only change this if you get a professional license here.

If you don’t go with a pro license these emails will send from feedback@cusrev.com.
Set your email from name (pro license only)
The from name is the name used in the review reminder email that’s sent out to your customers.
You can’t change the from name in the free version you can only change it if you get a professional license here.

If you don’t go with a pro license these emails will say that they are sent from Customer Reviews on behalf of “your store”.
While the email sender details aren’t customisable in the free version of CusRev, I find it’s really clear that it’s an independent review process being conducted on your behalf.
Configure your reply-to email address
If someone replies to the email invitations to leave a review, that has to go somewhere you will receive, so make sure you enter a reply-to email address. By default, this will be your WordPress admin email address.

Define an email to send customer review notifications to
Also, make sure you enter an email for notifications. This is used to send you notifications about any reviews that have been submitted. again this will default to your WordPress admin email.

Choose your interface language
You can change the language that will be used in the emails and review forms. The default is English and there are stacks and stacks of languages to choose from.

Customise your email template
The email template is something that might be a little overwhelming but changing the subject and the email heading and the body here will update the content of what’s actually sent to your customers when they’re invited to leave a review.
Customer Review Reminder Email Subject
It’s up to you what you want to put in here. I personally quite like having it just as “Review your experience with us – site name”.

Customer Review Reminder Email Heading
The email heading is displayed in bold print at the top of the email. Consider it your main call out. The default “How did we do?” is spot on, but you can customise it if you wish to.

Customer Review Reminder Email Body
The email body is fairly straightforward to edit. You will likely recognise many of the formatting tools from the WooCommerce product editor. You can add extra links, images and more into the body. Just remember though, you want people to leave you a review, so don’t distract them from that purpose. The default email body actually does work very well! Just tweak it a little to better fit your brand.
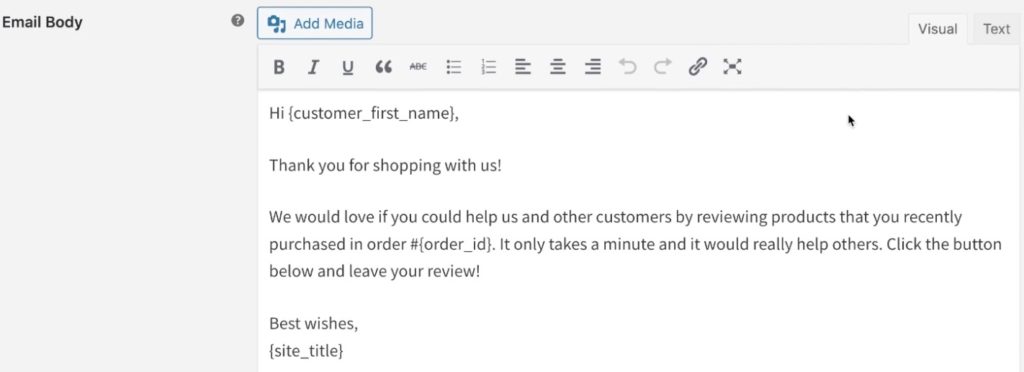
There are a number of variables available that you can use in these emails to help personalise them. You’ll see them down below the body box. You can do some cool things with these variables, like inserting a list of the products that the customer ordered.
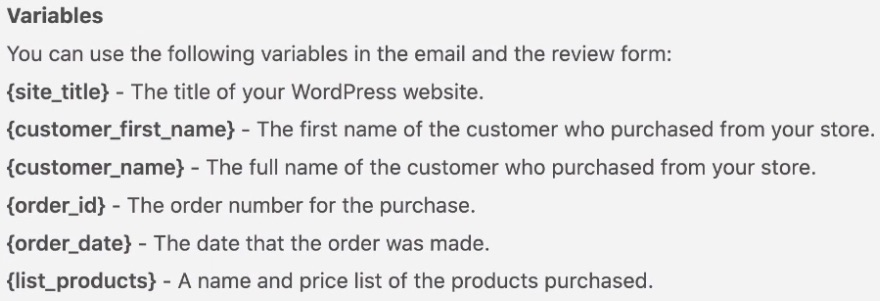
Customer Review Reminder Email Footer
The email footer will, by default, have all the relevant information to comply with various spam laws around the world, so you don’t need to worry about that. However. if you want to modify that email footer, you have to purchase a pro license here.

Customer Review Reminder Email Colours
Your email colours, by default, are the Customer Reviews brand colours.
You can change colours around to match your business better if you wish, or you can leave them as the CusRev colours to reinforce that reviews are being collected independently. It’s up to you. To change colours, just press the “Select color 1” or “Select color 2” buttons and pick your colours from the picker.

Alternatively, you can enter the appropriate colour HEX code.
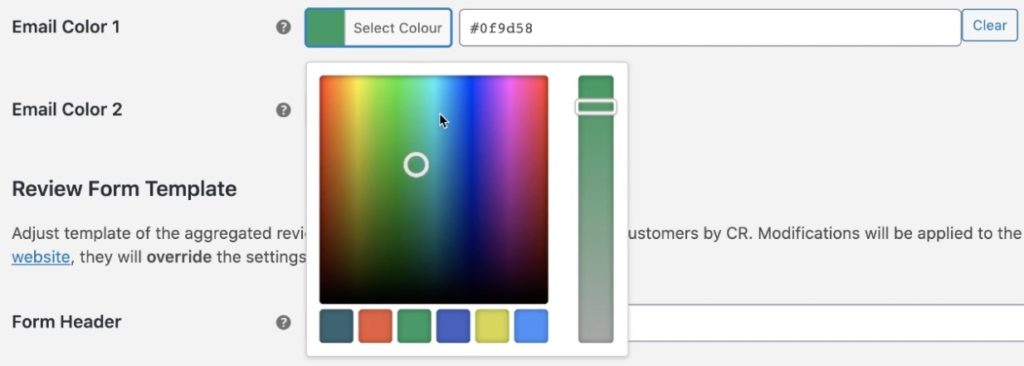
Make sure you test your emails before sending them out to anyone (I’ll show you how to do that near the end of this article) because you don’t want to be sending out badly coloured emails that are hard to read and hard on the eyes.
Customise your customer review form
Next up is the review form template section and this is where you can figure how the review form will actually look for your customers when they leave their reviews.
From within the WordPress dashboard, you can only edit basic elements of this form. There is an advanced form builder available via the Customer Reviews dashboard if you sign up for an account.
Within the WordPress dashboard though, we can adjust our form header and the body.
Customer Reviews form header
The form header is the text that appears just above the form body and the form itself. This text is in a larger heading font. Keep it straightforward and consistent with your email CTA. The default works great in my opinion!

Customer Reviews form body
The form body is the text that appears between the form header and the form. Again, keep it simple. You don’t want to waste your customers time and potentially dissuade them from submitting a review.

Shop Rating
The shop rating field allows you to ask your customers if they want to leave a general shop review in addition to product-specific reviews.

Personally, I think this is worth doing as it can separate comments on shipping and customer service out from the product reviews, and it can give you more general reviews for use around your website. Tick the box if you want to collect that kind of review from customers.
Comment Required
Comment required forces your customers to leave a comment in addition to a rating (out of 5).

I don’t make comments mandatory because, as useful as it can be, not all customers want to take the time to add a comment but are happy to give a quick rating. A star rating is better than nothing at all.
Attach Media
Do you want customers to be able to attach media (pictures and videos) to their reviews?

I do. I think it is great to be able to get that extra content from customers to help other potential customers make better buying decisions.
Rating Bar and Geolocation
Rating bar and geolocation can only be edited if you have a professional license.
The default visual styles for rating bars are stars based on a scale of one to five. I think this is perfect for most stores.

Geolocation lets customers indicate where they come from with their review.
Form Colours
Finally, you can set your form colours. The colour selection process for form colours works exactly the same way as the email colour pickers. Again, make sure to test how your colours look before sending the form to a customer!
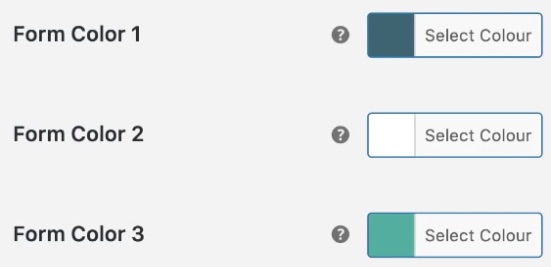
To see where each colour is used on the review form and how they look, you will need to send yourself a test email which I’ll go over below.
Save
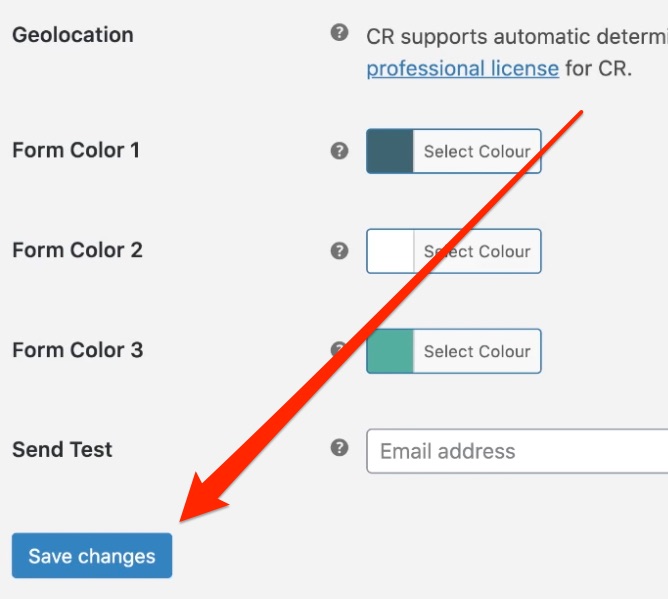
Press the blue save button to save your configuration and you are almost ready to go.
Test!
Make sure you test your email and form! To do a test, you want to put your email in the send test field down at the bottom of the main settings screen.
Once you have entered your email, press the send test button.

You will be sent a test email with all the variables filled in and your custom colours shown. It will also have a working link that you can click to go and see how the review form looks as well.
That’s it you’re all set up now. Without doing anything else your customers are going to get automated review reminders sent out to them and they will start to leave reviews for you and your products without any intervention from you at all (except maybe moderating reviews if you choose to enable that).
Extra features
If you want access to a few more features but you don’t want to go with a pro license you can enter a license key at the license key screen. To get a license key you can click this link to go sign up for a free license key. Once you create an account and enter your license key, you’ll have access to some really cool things like review trust badges, being able to publish your reviews into social media, allowing customers to refer their friends, offering coupons in return for revies, and analytics to see how your reviews are actually performing.
On this particular client site we’ve sent 161 invitations just in the last month and that’s 84 reviews that have been received. That’s huge!
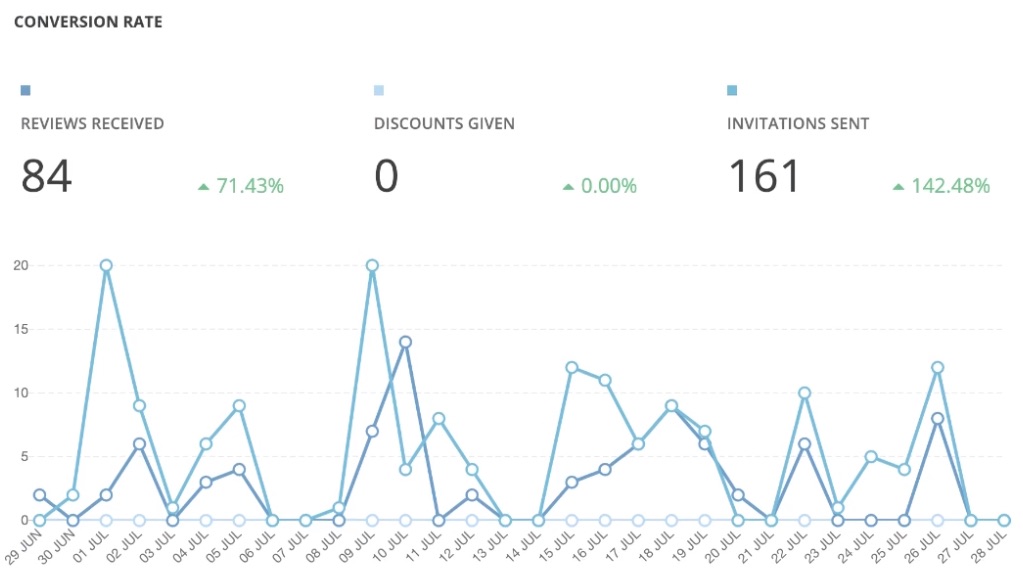
The extra features available with a free license key are fantastic and let you do a lot more to boost your review conversions and more importantly, your sales. Stay tuned for future articles on how to make the most of these features.
So, that’s it. How are you using Customer Reviews for WooCommerce in your business? Let me know down in the comments below and make sure to check back soon for my next article to help you get more customer reviews for your WooCommerce store, automatically!
Want to display product and store reviews in posts, pages and other places around your website? Check out our blog post: How to insert CusRev customer reviews around your WooCommerce store to build trust with potential buyers
Did this article help you out? Pin it and help someone else find it too!
