Have you got an idea of something you want to sell? Would you like to get started with e-commerce but you don’t have any cash to fund launching a website, buying stock or doing any marketing? Is it possible to get started with e-commerce without money? If so, where do you even begin? The short answer is, yes! Using the free Ecwid e-commerce plan, you can definitely get started selling online in the e-commerce world without any money or capital.
Choose your niche and products
Now comes the fun part! Picking what niche you want to operate in, and subsequently what products you want to sell. Maybe you have already found the products, but you still need to know who is going to buy them (your niche).
Picking your niche
Picking a niche can be a challenge and a lot of fun at the same time. However, if you aren’t sure where to start, I would suggest that if you’ve found a product that meets a need for you, you could look at yourself as the buyer.
Most of the time, we identify potential opportunities based on problems, or gaps in the market, that we have found in our own lives. So, that’s a great place to start.
Who are you? How would you describe people who are like you? Perhaps your niche is men aged between 20 and 40 who travel a lot and don’t like taking razors or bulky electric shavers with them on their trips. Maybe it’s women aged 35-50 who work in a corporate environment and like making subtle statements with their hair accessories.
It’s up to you, and there is a lot of research you can do on this, but I’ll leave that for another article.
Finding your products
If you aren’t sure what products you want to sell, or where to get them from, there are a few great places to start. Have a look at current trends in search and buying behaviours on e-commerce marketplaces like eBay.
Here’s some great places to check for trends:
- eBay Deals
- eBay Trends
- eBay Best Sellers
- Amazon Best Sellers
- Ali Express Popular Searches
- Red Bubble Top Sellers
You can also check trends in search behaviour on the Google Trends website. This can be broken down by country and regions within countries so you can really hone in on trends in the area you are looking at selling to.
Focus in on your products to suit your niche.
Stay away from broad product categories and generic products. It can be pretty hard to compete for general terms and products that are intended for ‘everyone’. The only exception to this is if you happen to have some celebrity status or following. For example, a plain white t-shirt. You can’t really compete with the likes of Kmart that sell these for just a few dollars unless you are Kanye West. Then you can sell a plain white t-shirt for $120 and it will sell out.

Look for very specific products that meet the needs and desires of your niche. For example, instead of a plain white t-shirt, you might have more luck with printed t-shirts showing funny sayings that people in a certain niche can relate to. There are some great examples of this on RedBubble, like this INTP sarcastic functions t-shirt. I would expect a shirt like this to appeal to most INTP people (like me) who are aware of their Myers-Briggs personality type.
If you aren’t sure what your niche is yet, but you have a product you want to sell, look at what makes that product unique. Think about who is going to want these unique properties. Hone in on the details until you can identify very specific kinds of people. Make them your niche and promote the benefits that they want. If you can’t get that level of detail from your product, it might not be a good choice for starting out. You need to know who it is that will want your product in order to make sure you get your product in front of them.
Think carefully about your product price
High-value items can be harder to sell. Generally speaking, people are less likely to spend $100 on an impulse purchase than they are a $40 item. As a result, more expensive products will also get you more customer scrutiny. The higher the customer risk (the money they are letting go of), the more research they will do into the product, and into your store. They are more likely to check reviews and want to know how trustworthy you and your products are.
Quick sales are great little wins for you, but you need enough margin for the product to be worth selling, especially when you factor in running promos like free shipping. Look at products around the $30-$60 mark that are low-cost to deliver. This is cheap enough to still be an impulse purchase, but should still be high enough to give you a decent enough margin.
Which e-commerce business model is right for you?
There are a number of different business models you could use for your e-commerce business, however, the only way to truly start an e-commerce business without any upfront expenses is to dropship. If your suppliers are nearby and you can get stock delivered quickly, you could also get started with an on-demand model. What’s the difference?
Stock-on-demand model
Using the stock-on-demand model, you set up your business and start selling product. Once you make your first sale and receive payment from the customer, you place an order with your supplier for the product. The supplier ships the order to you (or you pick it up from them), and you then ship it out to your customer.
This approach can be tricky as many suppliers have minimum order quantities and they can sell out. If they have minimum order quantities then you are still going to be out of pocket on your first order, unless you sell to your customers in a way that ensures you will have multiple sales before you place an order. This is often used in food bulk-buying groups. They take orders throughout the month and then place a single order with their suppliers at the end of the month. Group members know that their orders won’t arrive until early the following month but get the benefit of the lowest possible price since the group could buy in bulk rather than individually.
If you go this way, make sure you clearly explain any possible wait times that might impact your customers and have a plan in place on how to deal with possible out of stock items.
The stock-on-demand model can be a bit tricky to manage. You have to deal with stock as soon as your first orders arrive, and you may end up out of pocket on supplier orders. Since stock must be delivered to you before you can ship it out to customers, your margins might take a hit if your supplier doesn’t have any kind of free delivery arrangement. Managing stock on-demand comes with a lot of potential risks that are negated in the drop-shipping model.
What about returns?
Well, since you are managing the stock, you handle returns directly. Any returns will go back to you and it is up to you how to handle them. Any faulty products will need to be addressed with your supplier based on their warranty policies.
Genuine feedback on this model
I’ve used the stock-on-demand model in one of my previous businesses and found it to cause cashflow problems, particularly when orders slowed down. The reason being, many suppliers had minimum order quantities or order values. Spending $500 on stock because someone bought a $30 item isn’t great. It ties all that cash up in stock that might take a while to sell. If you are only selling a few different products, this might be ok, but if you have a large range of, lets say, many different sizes of shoes or clothing items, it can quickly add up.
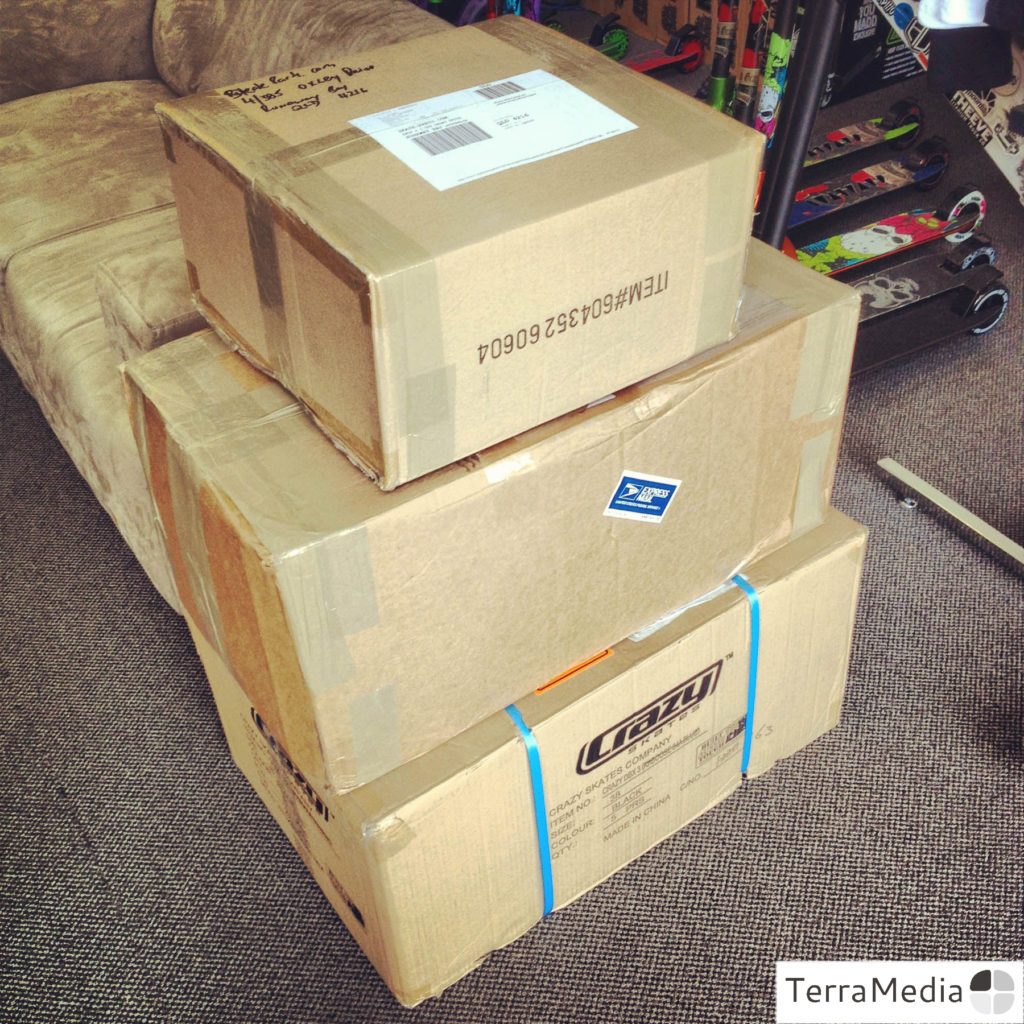
If you aren’t careful, this model can hamstring your business before you get off the ground.
Stock-on-demand can be a good approach though if you have another avenue of sales, such as a market stall or plans to open a physical store. Getting into physical storefronts can be challenging and is a whole other topic, but if you are going that way then you need stock in your store to sell. The point though is that you want to keep any extra stock moving as fast as possible, and something low-cost like a market-stall may help you to do that.
Drop-shipping model
Drop-shipping is similar to stock-on-demand except that you no longer handle stock at all. When you set up a drop-shipping business, you will build your e-commerce website, add your products, sell them, and your supplier then ships the item directly to your customer. You will typically pay the supplier at the time of order, however, some suppliers may offer a monthly account.
Drop-shipping does still carry the potential risk of products being sold out, but, since you aren’t dealing with stock yourself, the problem is simplified.
Removing yourself from the equation speeds up customer delivery time and frees you up to focus on more important things, like promoting your online store.
Using the drop-shipping model means you don’t need to outlay anything until you receive your first order, and that outlay is purely the cost of buying the items sold, and paying any delivery charges.
What about returns?
As for returned orders, some suppliers may be willing to handle the returns for you, some won’t. Chances are though, that at least initially, it will be easiest for you to handle returns yourself and simply add any restocked items to your own local inventory. When you sell that product again, just ship it yourself, or use it for a promo.
Genuine feedback on this model
I’ve launched a drop-shipping business as well. Drop-shipping is still hard. Don’t expect to make it overnight. However, there is a lot less financial strain going this way. You can quickly pivot between products based on demand, and it’s entirely possible to spend absolutely nothing except the cost of stock for each order.
This is the model I would recommend for anyone looking to get started in e-commerce. It carries less risk and gives you more freedom to explore different ideas. Just remember, you are still responsible for meeting any warranty obligations that may apply for fault products. Your supplier might replace or repair the faults for you, but it is your responsibility as the seller to ensure that this happens.

Brand yourself
Ok, you have a product. You know your niche. Now who are you?
It’s time to think about how you are going to brand your business.
Choose a name
You can spend lots of time brainstorming ideas, running them by friends and family, but it doesn’t have to be complicated. Some of the best names are made up, like Google or Ecwid, and other great ones are multiple words mixed into one word, like WordPress and Shopify.
If you can identify your product in your brand, that can make it easier for customers to identify why they might be interested in what you are selling. Some examples for a brand selling wallets might be: “Patchwork Wallets”, WalletMan, “Wildcat Wallets”.
You can see in the examples above that each name conjures up different images of what kind of wallets might be sold, so make sure that, as random as your name might seem, it does fit with your product and niche.
Also, be sure you aren’t infringing on any trademarks or you could get yourself into a lot of strife. Governments in most countries have trademark searches available. Just search for “trademark search <country>”, eg “trademark search Australia”, which will bring you to this site. Be aware, there are sites that will charge you to do trademark searches. Never pay for this. Trademarks can be freely searched in the official registries of each country.
Register a domain name (optional)
This article is all about getting started without any money, and a domain name will cost you a few dollars. That’s why this step is optional. However, it is worth spending the money on registering a domain to match your business. This gives you a web address like mybusinessname.com – ours is terramedia.com.au.
Domain names range in price depending on where you register them, what extension you choose (.com, .org, .com.au, .tv etc), how long you register it for, and any promotions that are currently on offer. You can typically get one for between $15 and $45 for the first year. Some sites like Crazy Domains and GoDaddy often run promotions offering cheap registrations for your first year and we can also register a domain name for you if you need assistance. Contact us for help.
A domain name goes a long way towards building customer trust in your business, but to use your custom domain name, you will also need to upgrade to a paid plan with Ecwid (pricing), so you may wish to leave this until you are ready to go live.
Set up your e-commerce platform
What platform should you choose to get started with e-commerce without money
There are many e-commerce platforms to choose from. One of the most popular is WooCommerce, however, it does require a WordPress website, hosting and ongoing maintenance in order to ensure it is secure. WooCommerce can be set up on the cheap, but once you factor in hosting costs, it definitely isn’t free and there is a lot to learn.
Related reading: Is Ecwid or WooCommerce better for small businesses?
Another popular player in the space is Shopify. Their platform is used all over the world and can get you up and running quickly and easily. However, they only offer a free trial. It’s a great way to get started as their trial is for 90 days, however, once you reach the end of that 90-day window, you are up for $29/month USD to maintain a basic Shopify store subscription. You should be able to start making sales in that timeframe, but this blog is all about getting started with e-commerce without money, and that means we need to look at another platform.
Ecwid is the e-commerce platform I mentioned at the start of this article and is the platform that I recommend for getting started selling online at no cost.
Ecwid is a cloud e-commerce platform similar to Shopify. This means you don’t need to get any hosting. However, unlike Shopify, Ecwid’s starter plans are completely free, forever (pricing & feature comparison between free and paid plans).
If you happen to have a website already, you can plug Ecwid straight into it, regardless of what platform your website is built with (eg, a Weebly or WordPress.com site). Ecwid is what I call a ‘portable’ e-commerce system. It can follow your business everywhere. If you don’t have a website now, you can build one separately later and then just integrate Ecwid seamlessly with it with very little effort. If you are on one of the paid plans, you can integrate your products directly with Facebook and Instagram. Upgrade to a business plan and you can also sell through Amazon, eBay and Etsy.
The portable nature of Ecwid makes it extremely appealing for a boot-strapped e-commerce business, and a free plan makes it a no-brainer. However, there is still one more reason I recommend Ecwid. The setup process is extremely simple. Ecwid can be setup in under 5 minutes. Yes, you can spend a lot more time customising things and experimenting with different configurations. However, you can potentially be selling extremely quickly with very little learning curve. The Ecwid engineers have put a lot of time into making sure the platform can be learned quickly and easily.
So, head on over to the Ecwid website and sign up for the free plan.
Get started with Ecwid
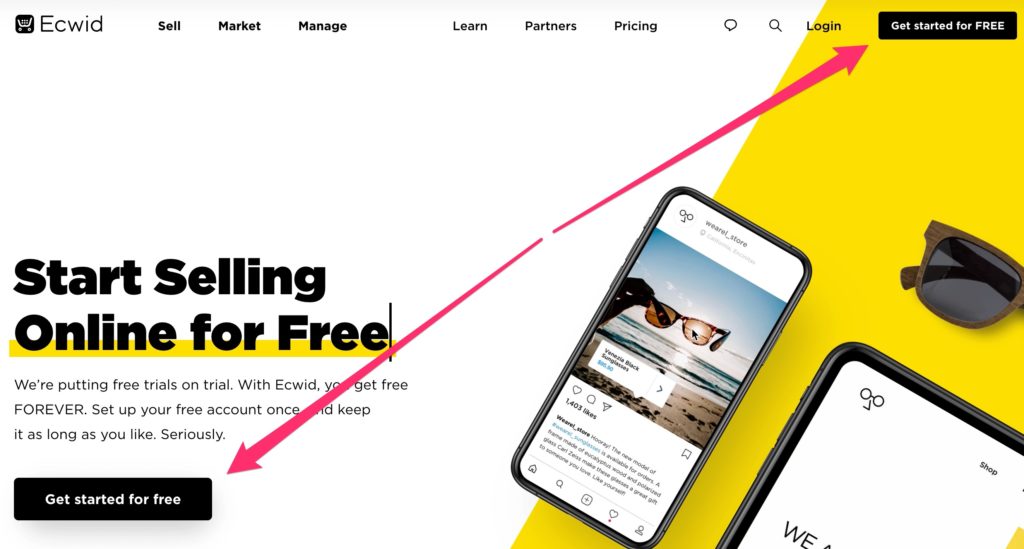
If you haven’t already, go to the Ecwid website and click one of the “Get started for free” buttons.
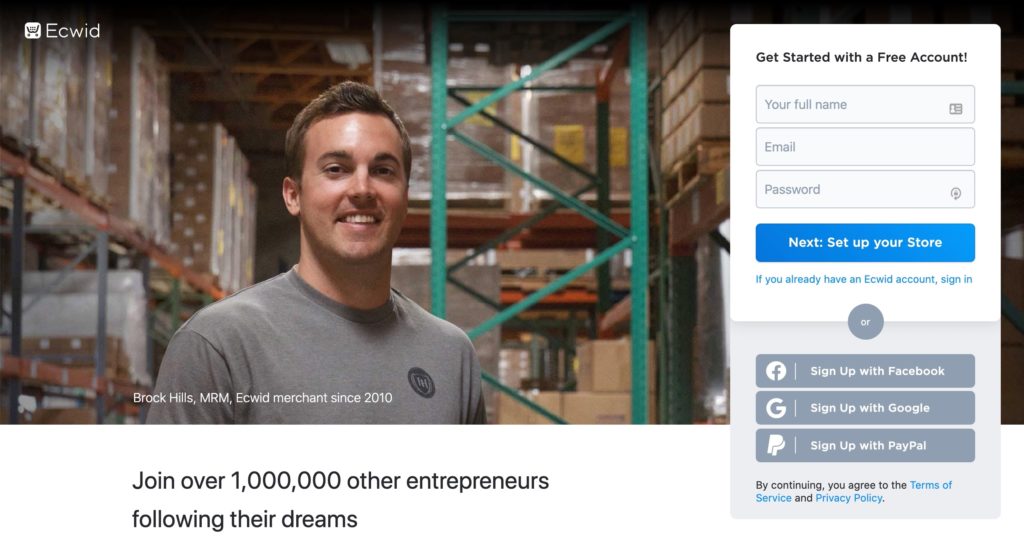
The signup process is extremely streamlined. Enter your name, email and a password then click the “Next: Set up your Store” button. Alternatively, click one of the alternate sign up buttons to use your Facebook, Google or PayPal accounts to create your Ecwid store.
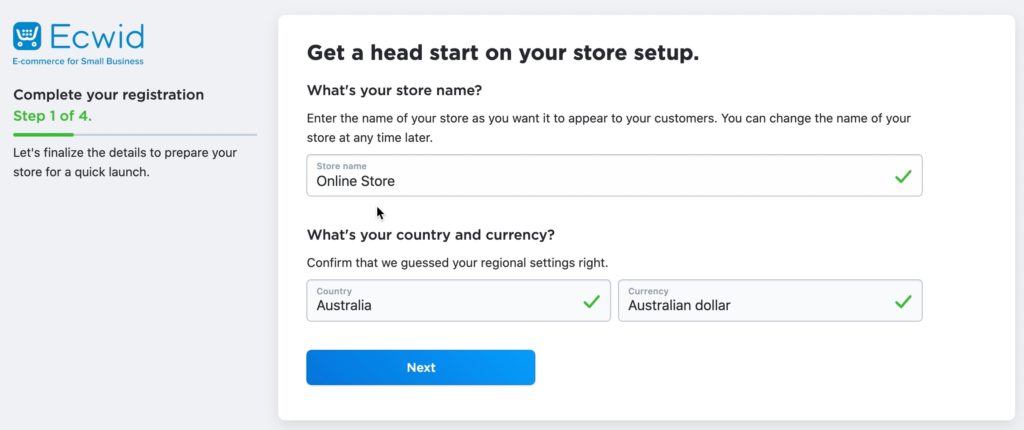
You will be taken to step 1 of the Ecwid on boarding process. Ecwid will attempt to guess your country and currency based on your location to help speed this up for you. So, enter your store name and make sure your country and currency settings are correct. If not, change them and click the “Next” button.
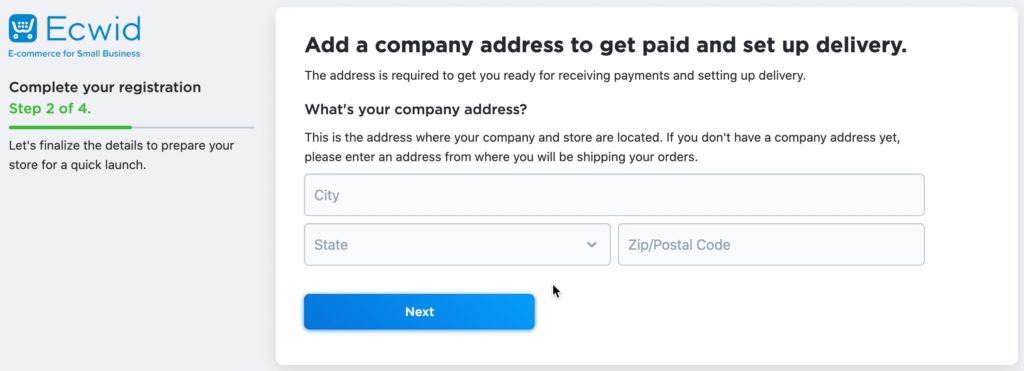
Step 2 of the Ecwid on boarding process is entering extra location details, used for setting up your payments and default ship from details. The exact address details required will vary depending on the country you selected in the previous step. For Australian stores, you will need to put in your City or Suburb, State, and Post Code. When you are ready, click the “Next” button to proceed.
On boarding step 3 is providing a bit more information about your business.
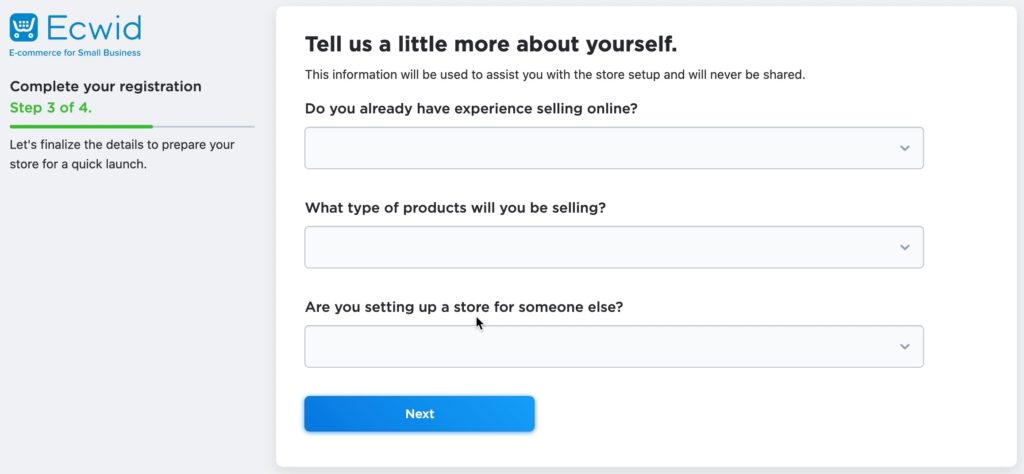
Under the “Do you already have experience selling online?” drop down option, you can choose the most appropriate option for you. This impacts what help steps Ecwid will show you later to help you get setup.

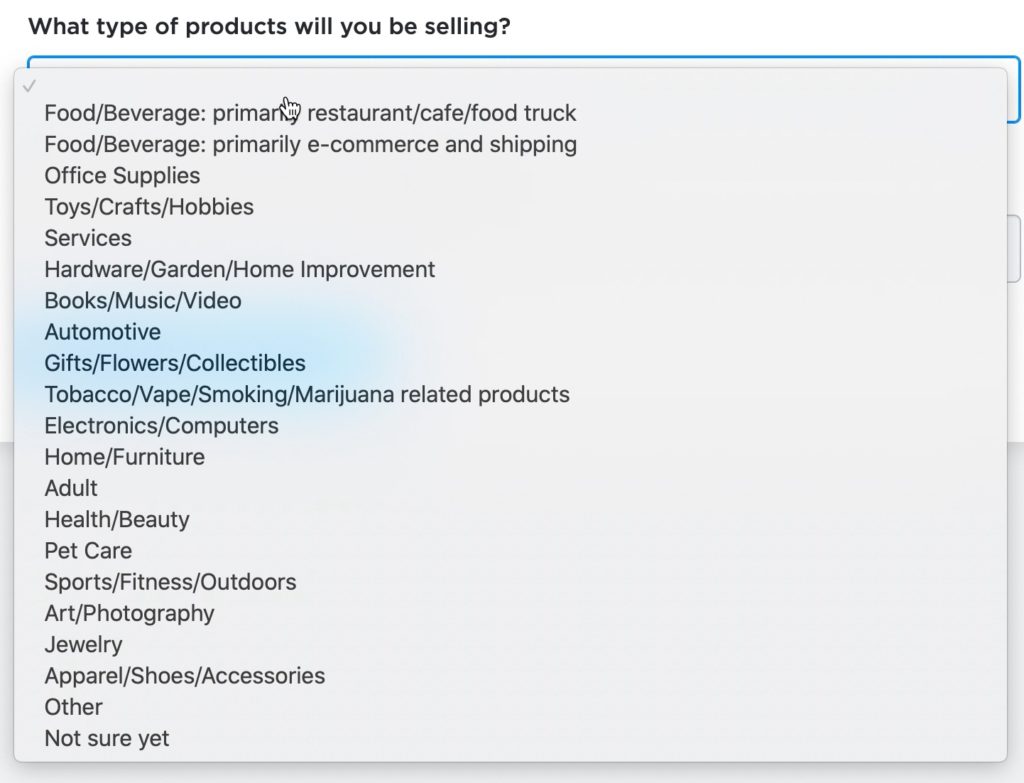
Under the “What type of products will you be selling?” drop down option are a variety of generalised choices. Choose the most appropriate one and Ecwid will pick a default theme to match, helping you get up and running faster.
The last option here is “Are you setting up a store for someone else?. Again, this impacts what help information Ecwid shows during the rest of the setup process. Select “No” since you are setting it up for yourself, then click the “Next” button.

Step 4 of your Ecwid setup is choosing where you’ll be running your store. This impacts the help information Ecwid shows you for streamlining your connectivity.

If you have a website already, select yes. Otherwise, choose no.

If you select yes, then you will be given the option to choose what platform your website is running (if you know it).
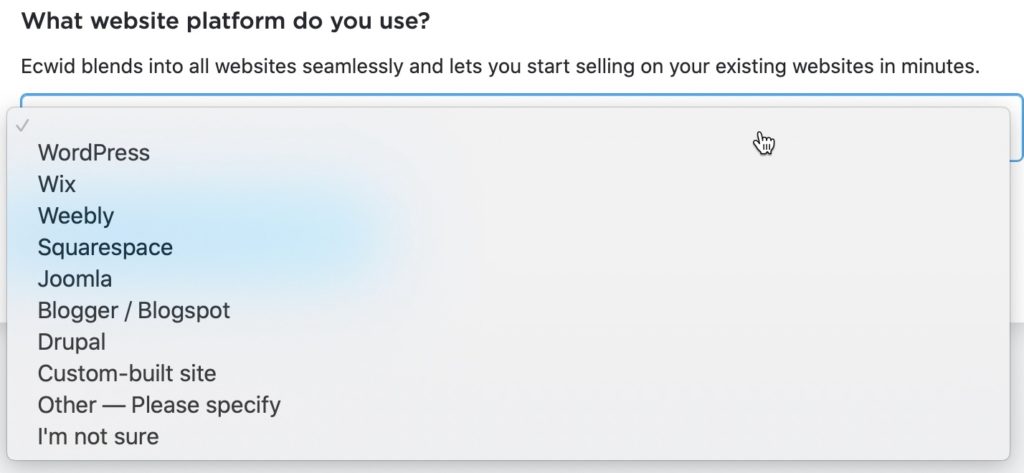
Once you’re done, click the “Finish & proceed to dashboard” button.
You will be taken to the Ecwid dashboard where you will be presented with your to-do list. Meanwhile, in the background, Ecwid will have also sent you a confirmation email to your registered email address. Make sure you check that and verify your email address as all important store communications will be sent to you there. You definitely want it to be working correctly!
Otherwise, you can start working through your setup checklist in any order. You can always access all these items via the dashboard menu on the left of the screen as well.
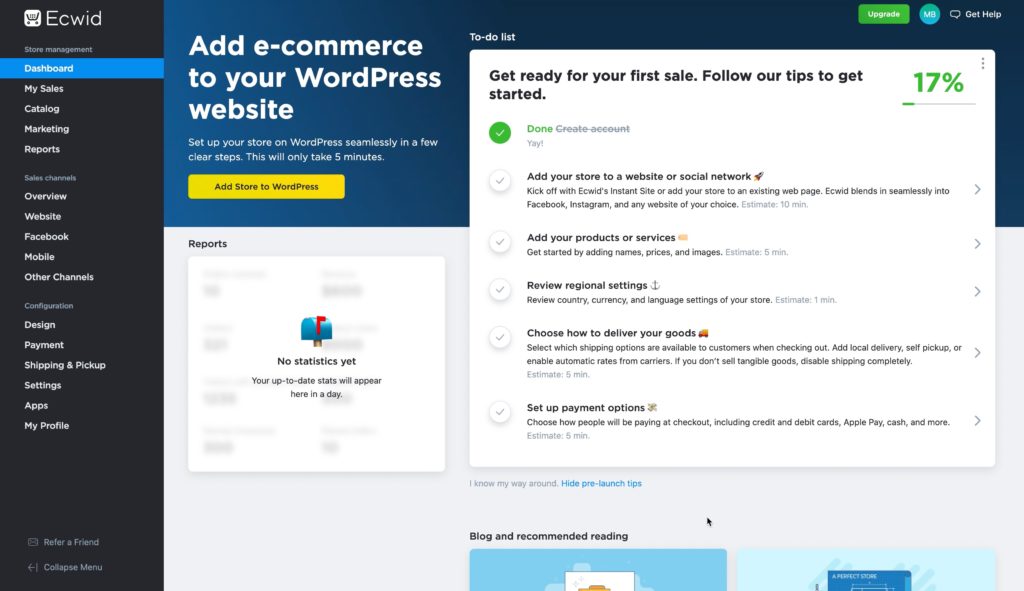
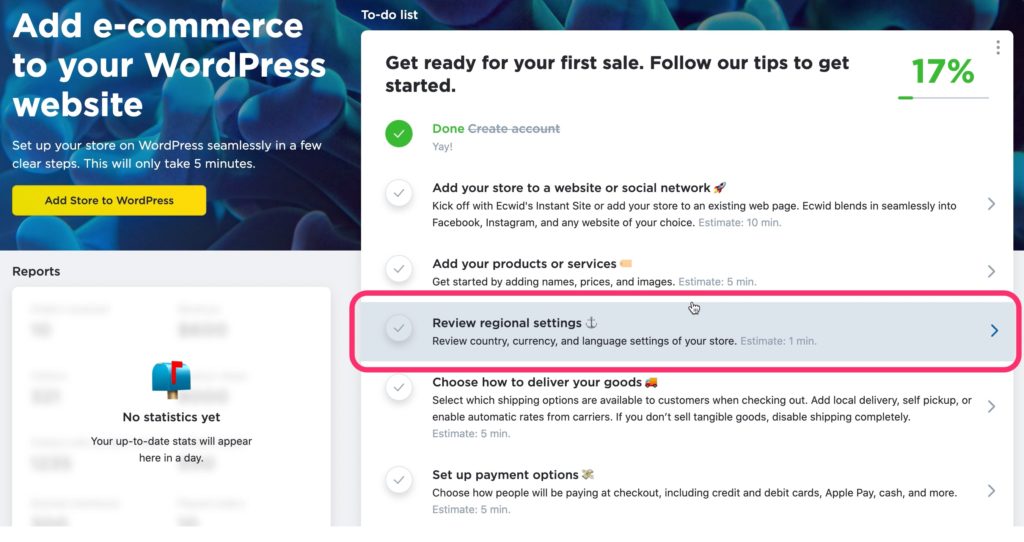
For this article, we are going to skip the next couple of items in our checklist and finish off the e-commerce configuration.
Click on the “Review regional settings” option in the to-do list.
You are taken to your site settings. You need to fill in any missing details in the “Store Profile” tab. You shouldn’t need to do anything in the other tabs right now, but it’s worth checking them all out so you know what is in each one.
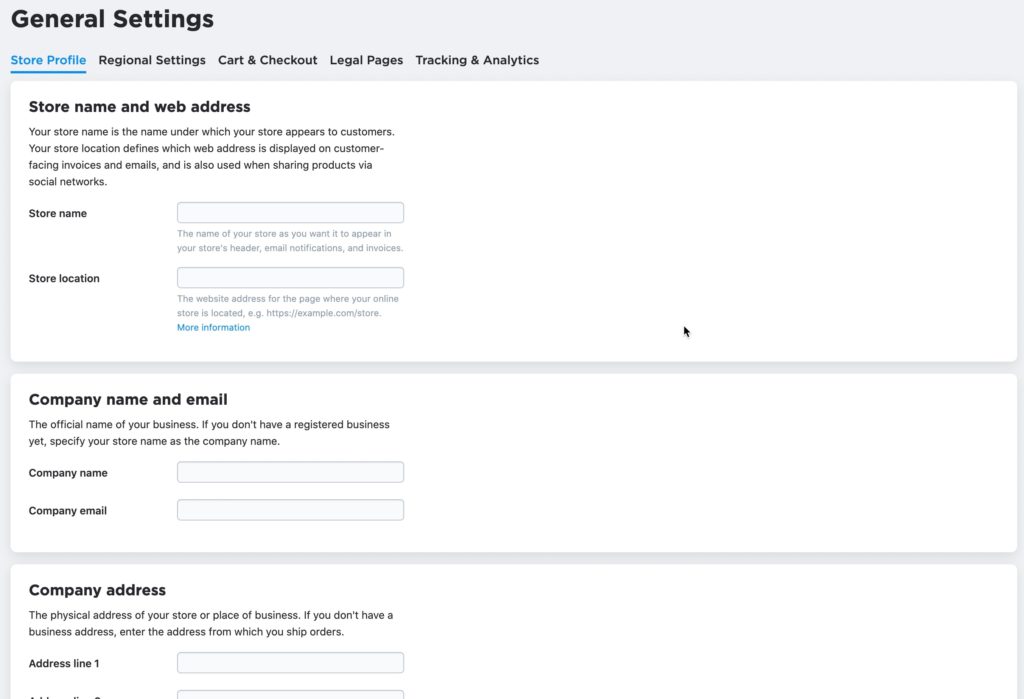
After saving your settings, you’ll be taken back to the dashboard and your to-do list.
Configure your delivery options in Ecwid
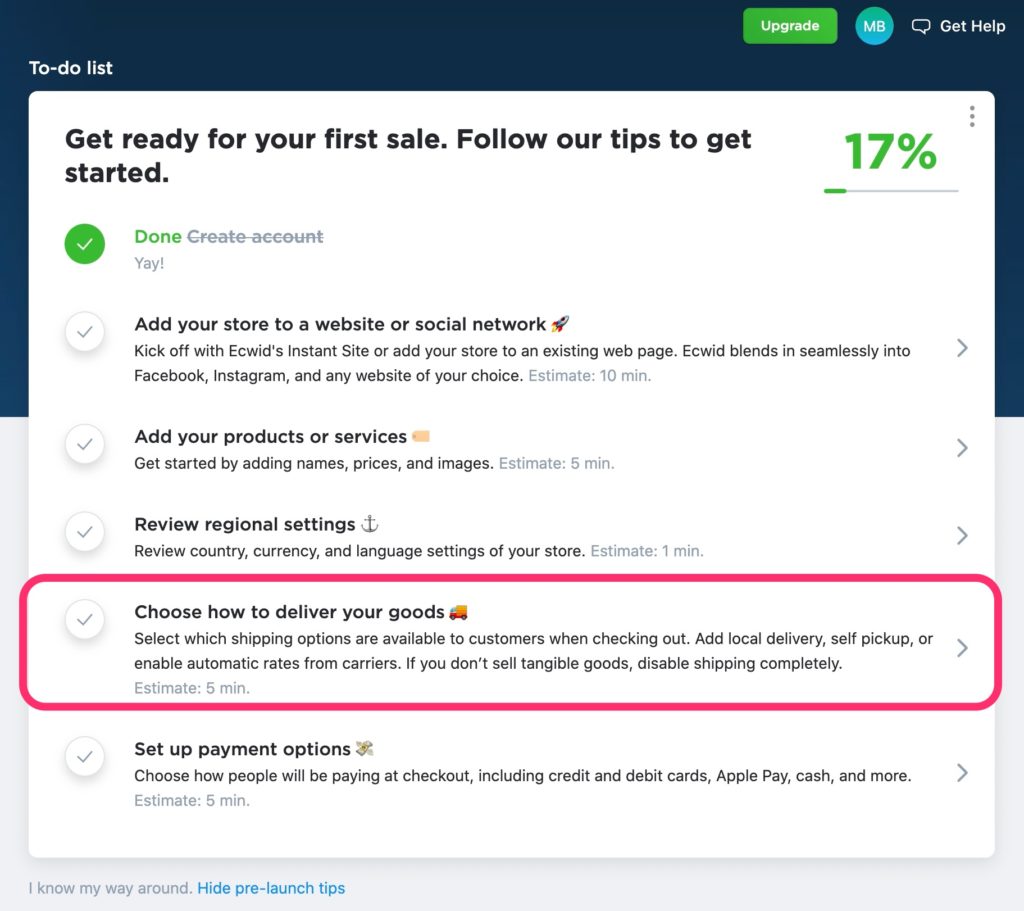
This time, click the “Choose how to deliver your goods” option.
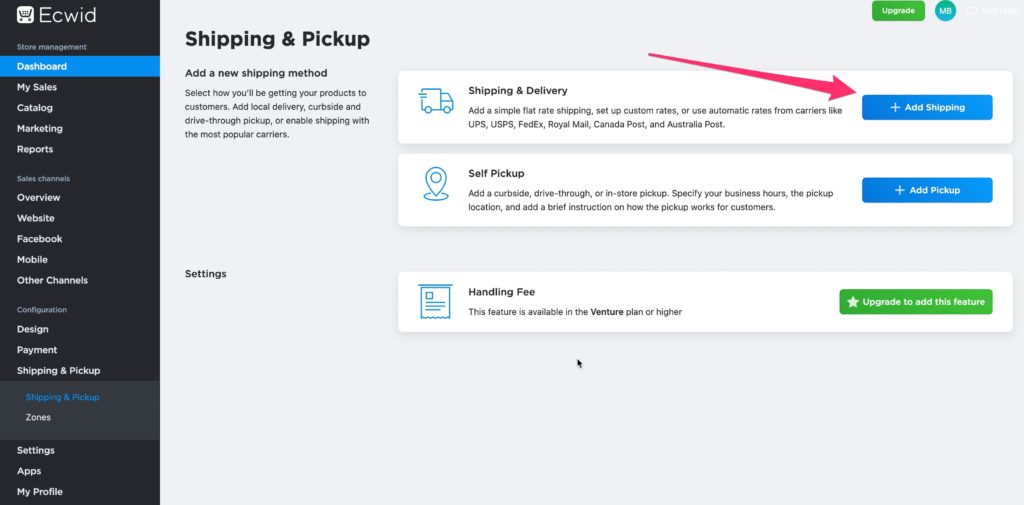
Here, you can configure your delivery settings. The two options that are available on the free Ecwid plan are:
- Shipping & Delivery
- Self Pickup
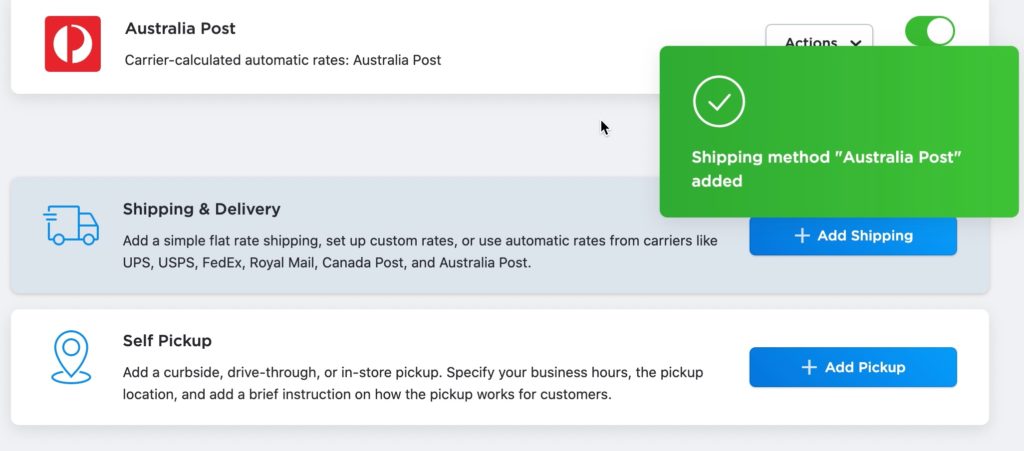
For the purpose of this tutorial, we’ll setup a shipping method be clicking the “Add Shipping” button. If you want to offer a pickup option, you can configure it by clicking the “Add Pickup” button.
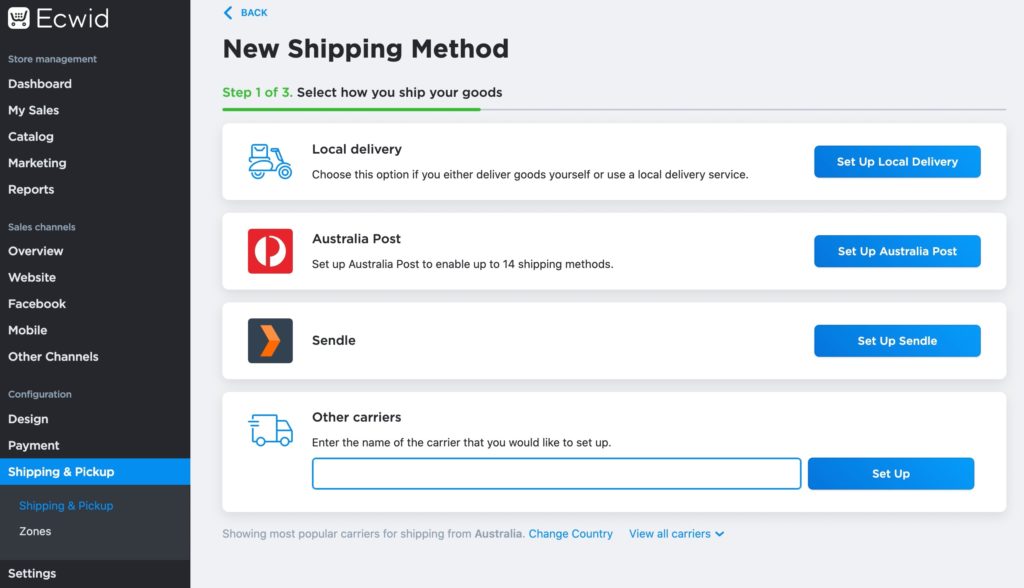
You will be presented with the most common options for the country you have selected. In Australia, this is:
- Australia Post
- Sendle
- Local Delivery
You can also setup your own “Other carriers”.
Australia Post is extremely straightforward to configure and is the easiest if you are just starting out. Click “Set Up Australia Post” or the appropriate option for you if it isn’t going to be Australia Post.
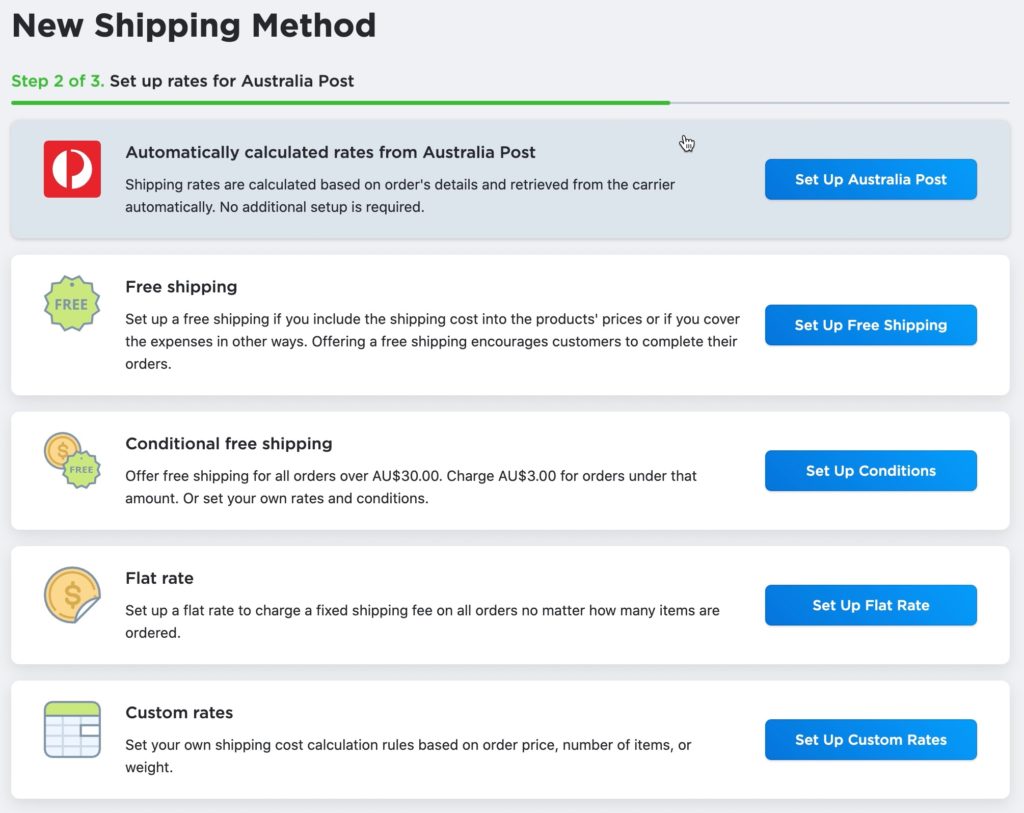
Most shipping options have some default choices, including:
- Free shipping
- Conditional free shipping
- Flat rate
- Custom rates
Most postal services and some couriers also have calculated rates available. Australia Post is one of these. To configure it, click “Set Up Australia Post“
The configuration is completely automated and you will see a prompt indicating that the shipping method has been added once it is complete.
Head on back to the dashboard and we’ll set up how we want to receive payments.
Configure your customer payment options in Ecwid
Click the “Set up payment options” item.
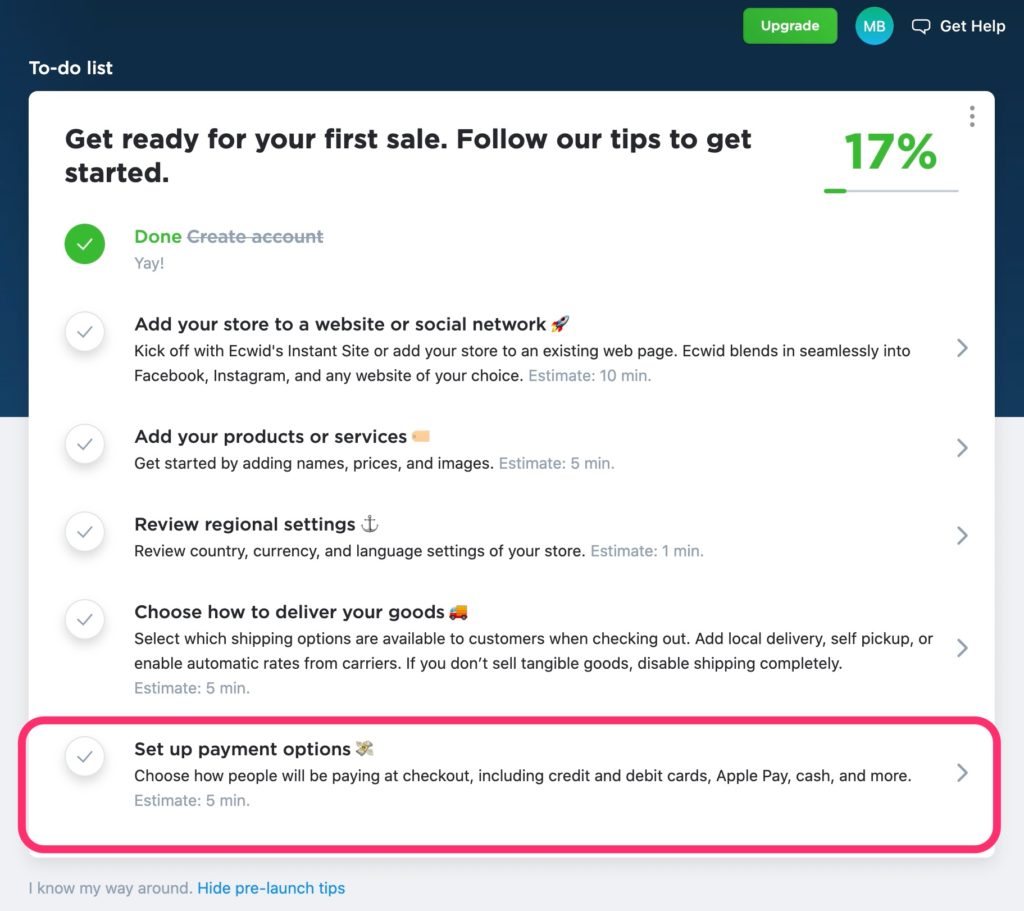
Like postage, Ecwid will present you with the most common (and easiest to configure) payment methods in your country. By default, cash payments is also enabled. If you aren’t taking cash payments (which most online stores don’t), click the green toggle on the right to disable it.
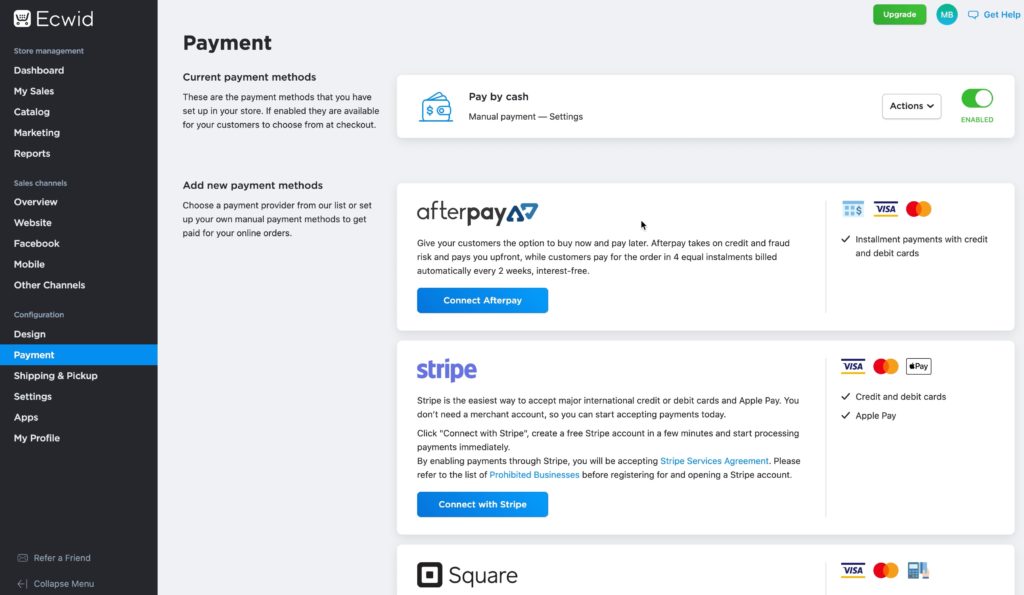
To connect or configure any of the shown payment methods, click the appropriate button, eg “Connect Afterpay”. Please note you will need to have accounts with these payments providers before you can connect them.
If you don’t see what you are looking for, you will find the “More options” box at the end. This has the remaining payments providers available for your country in it.
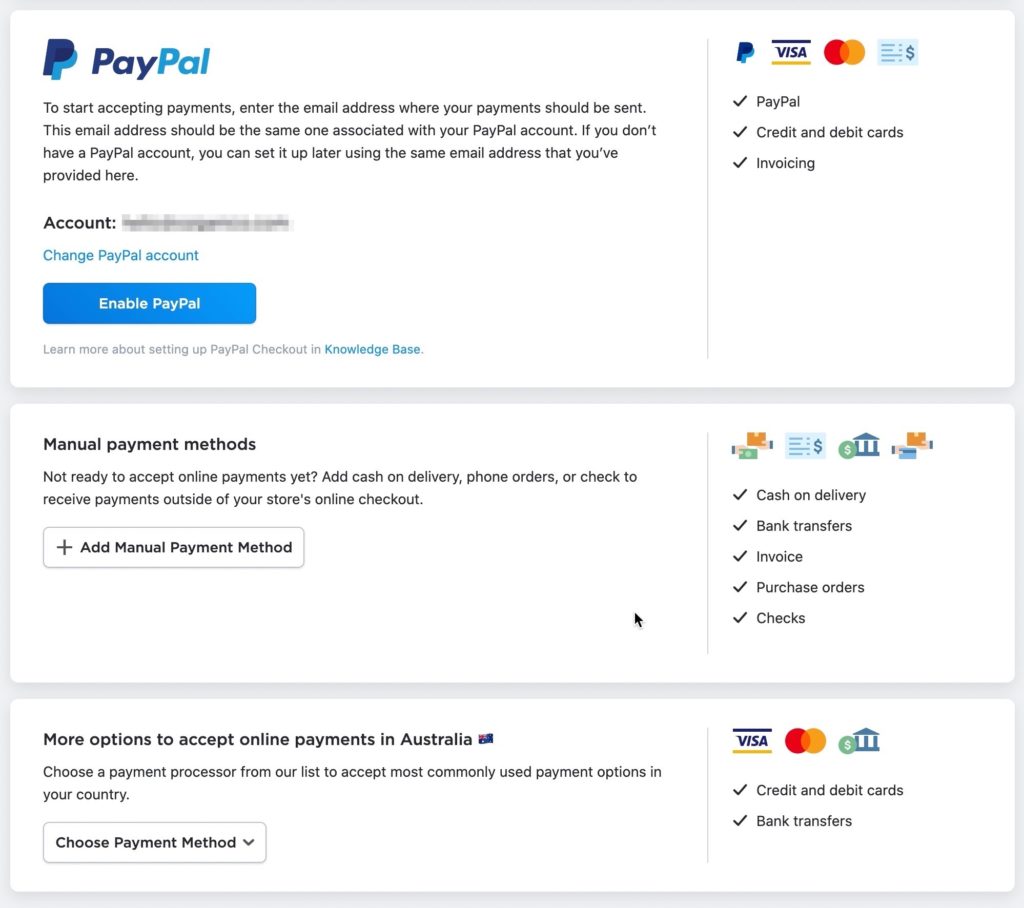
The simplest payment method to configure is PayPal. Scroll down until you see the PayPal box and simply click “Enable PayPal“. Your store will be automatically configured to accept PayPal payments with your registered email address.
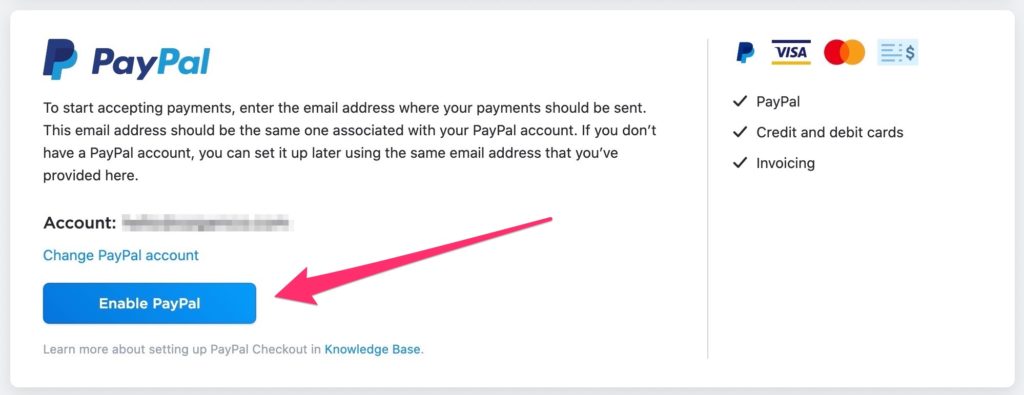
If you need to use a different address for PayPal payments, click the “Change PayPal account” link to update the email address. Otherwise, it’s time to move on to setting up the front-end of your e-commerce website.
Configure your Ecwid instant site URL
Back at the dashboard, click “Add your store to a website or social network“. It’s time to setup your instant site.
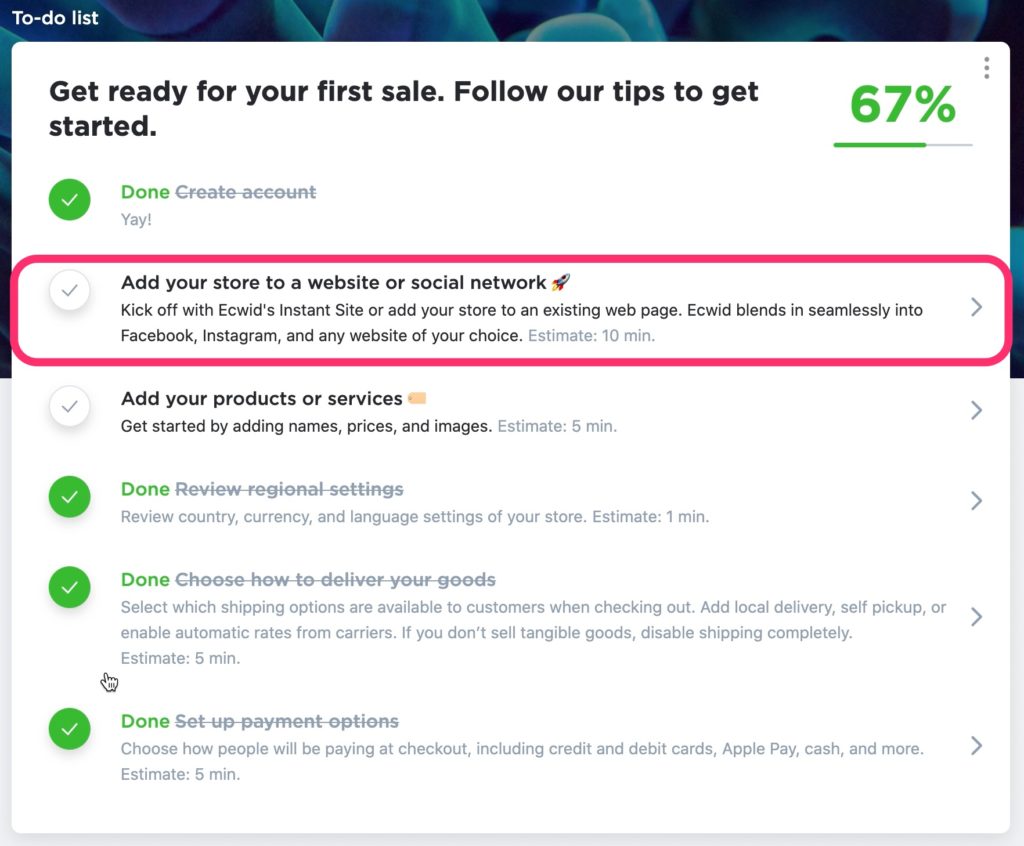
From this screen you can configure everywhere you would like to sell your products, be it social channels, marketplaces, through an existing website, or elsewhere. Just keep in mind that some of these channels require a paid upgrade. For our purposes though, we aren’t going to connect to an existing website, instead, we are going to use an Ecwid “Instant” site. These instant sites come ‘pre-configured’ for you and have a selection of pre-built themes ready to go. You can then customise these themes to your own branding with the simple theme editor.
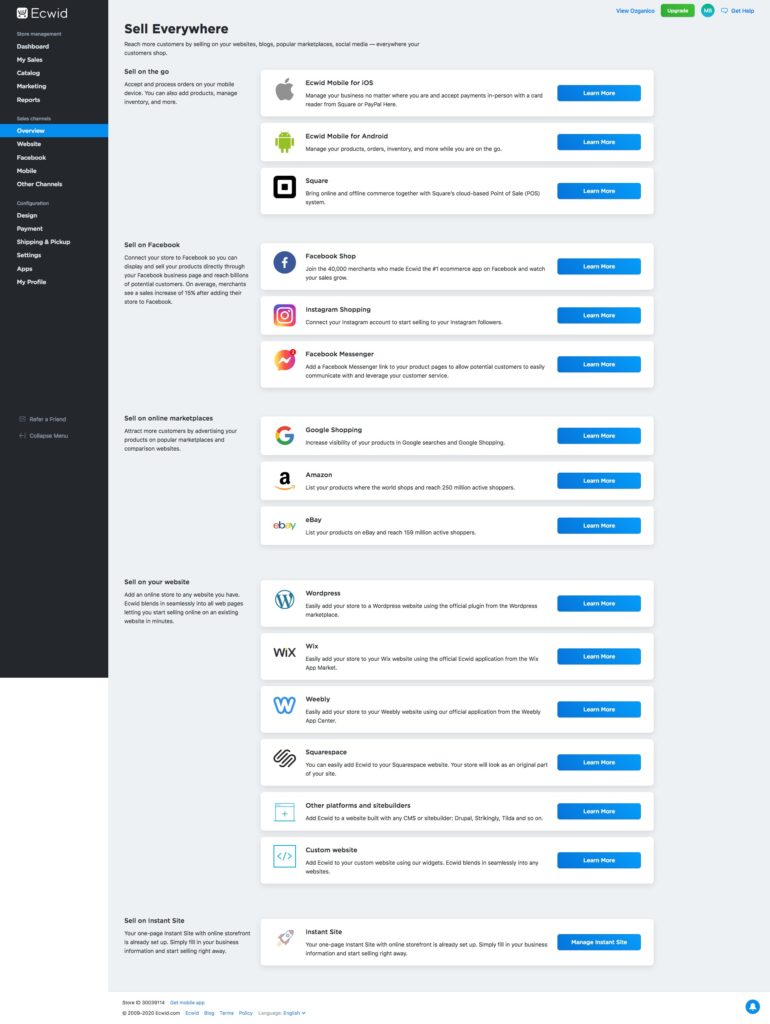
Scroll all the way down to the end of this screen to the “Instant Site” section and click “Manage Instant Site“.

You will be taken to configure your instant site and shown your default website address
On the free Ecwid plan, you get a free website address that looks something like this: businessname.company.site
If you upgrade to a paid Ecwid plan, you can use your own custom domain name with your instant site.
There are a whole bunch of options here, but most of the work is done for us automatically by Ecwid.
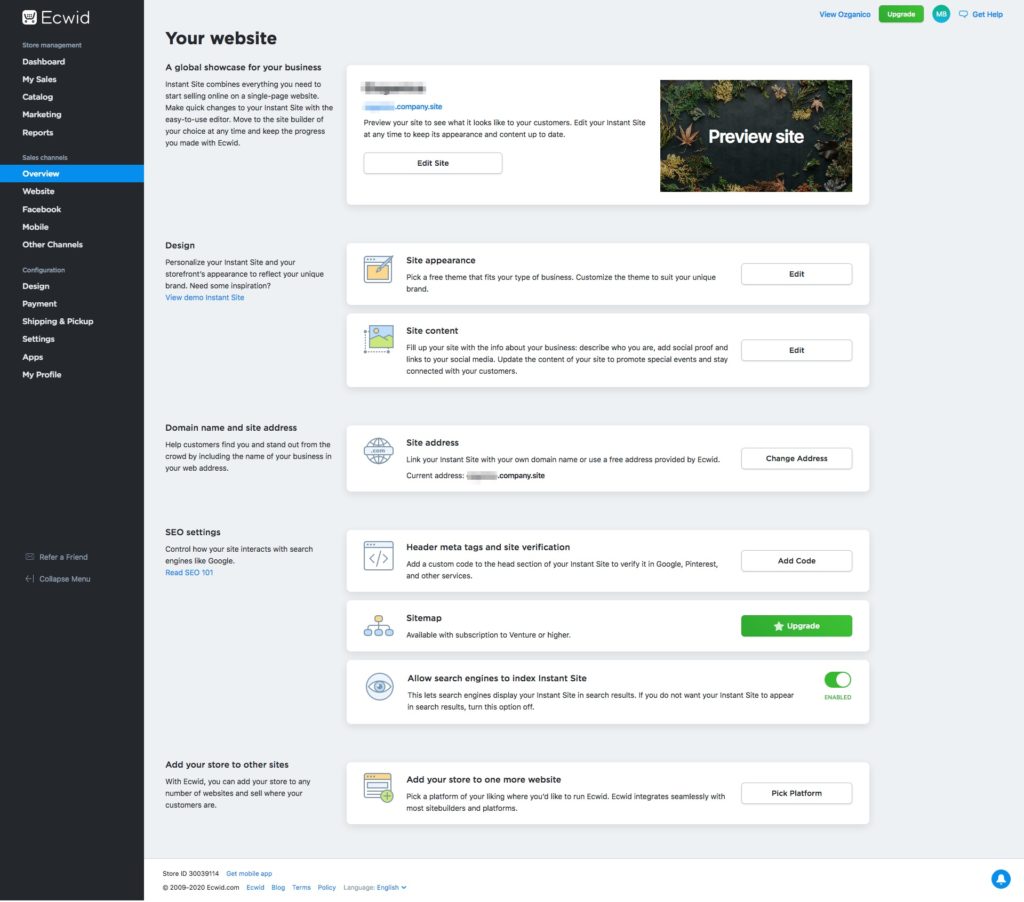
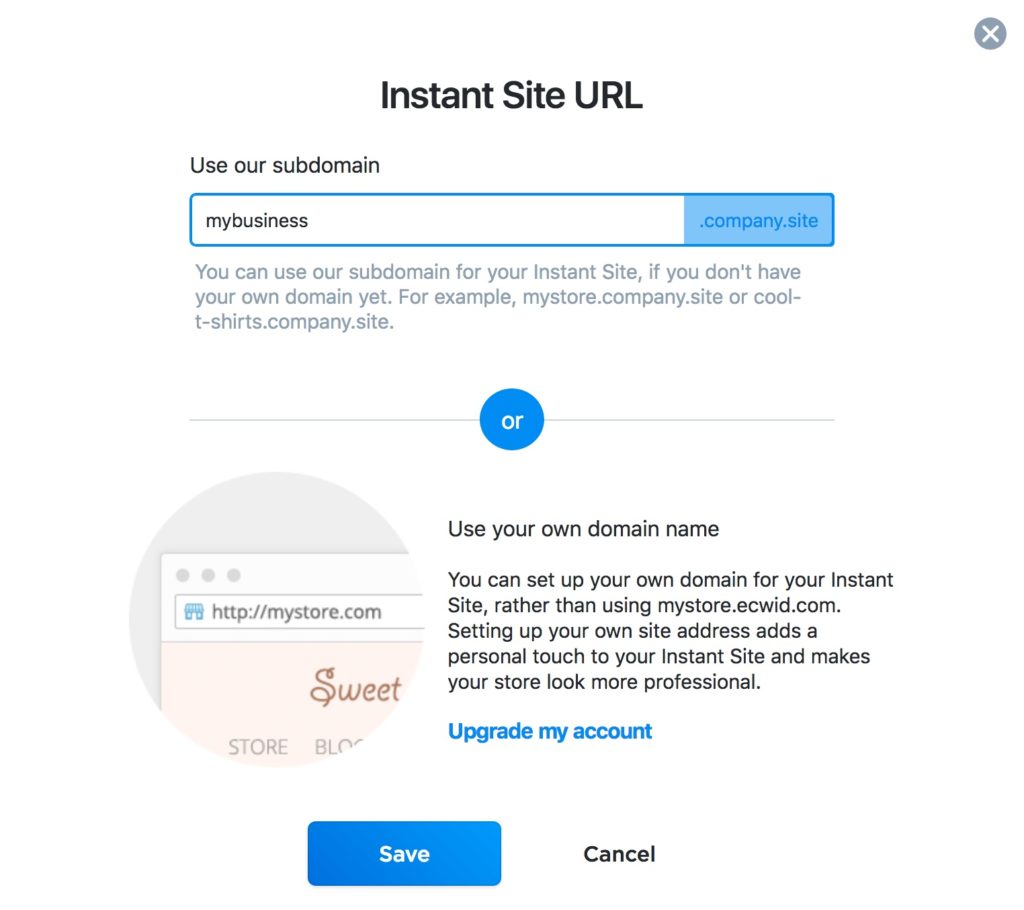
First, go to the “Site address” section and click the “Change Address” button.

By default, your address will use your site ID. This isn’t very user friendly. Change it to your business name.
If you want to use your custom domain name, you can configure that here too if you upgrade to a paid Ecwid account.
In either case, once you are done, click the “Save” button.
You can preview your site by going to this address. Whatever you see is what is live right now. That’s exciting right?
Your new e-commerce site is online!!!!
Customise your Ecwid instant site appearance
Back up the top of the page, click the “Edit site” button to go to the instant site visual editor and customise your site design.

There are a number of options available here to configure your header, page content, product appearance and more. Use these options to update your site as required with your branding and then click the “Save” button.
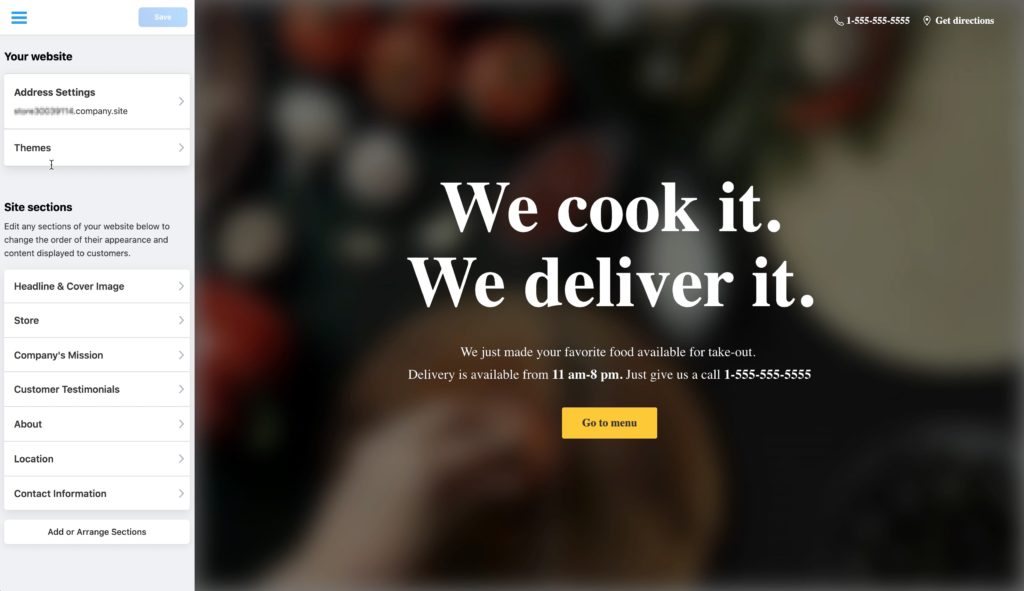
You can preview your site by going to the site address you set earlier ending in .company.site
It will look something like this, depending on what sections you have enabled:
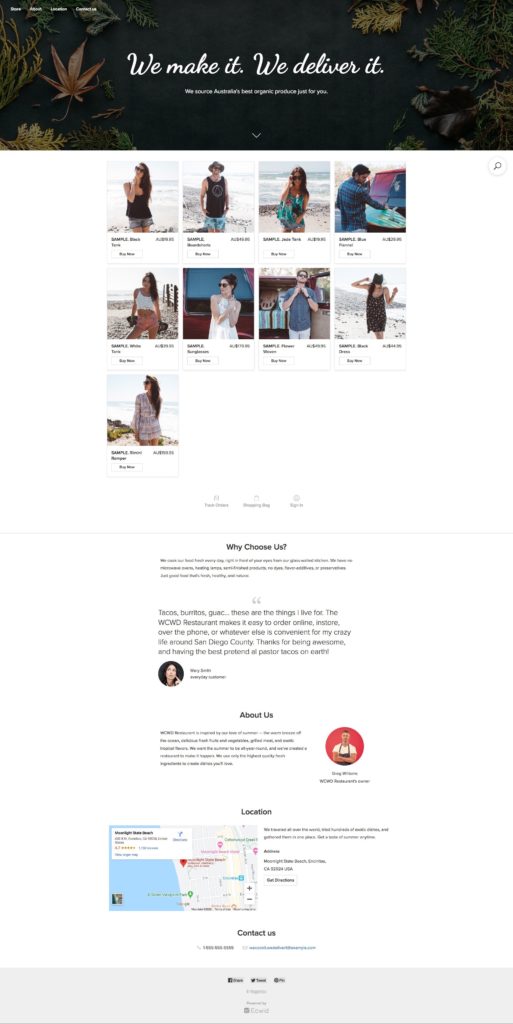
Now, you might have noticed all those sample products in the preview. Chances are, you aren’t selling them so let’s get your products setup!
Add your products to Ecwid
Back at the Ecwid dashboard, click on “Add your products or services” and it will take you to the product catalogue section.
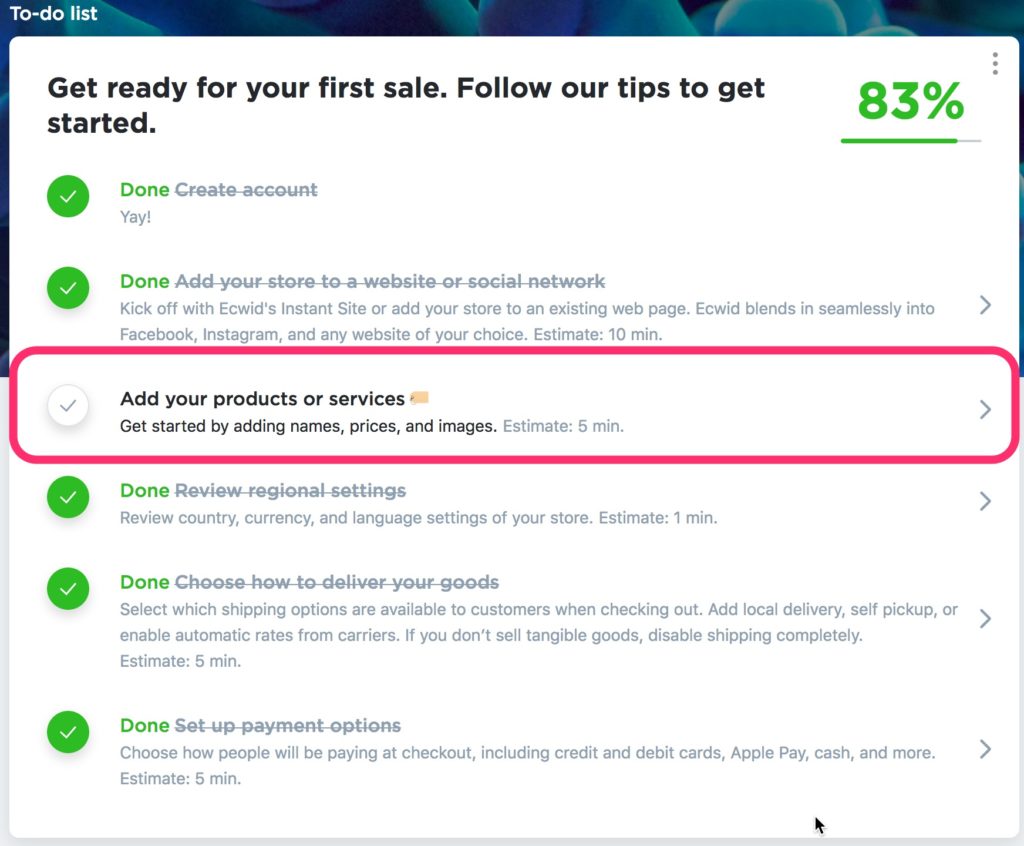
On this screen you can see all your existing products, which right now are all samples. You can click the “Edit Product” button on the right of any of them to see how they have been setup and edit them with your own products, or you can click the “Add New Product” button to start a new product from scratch.
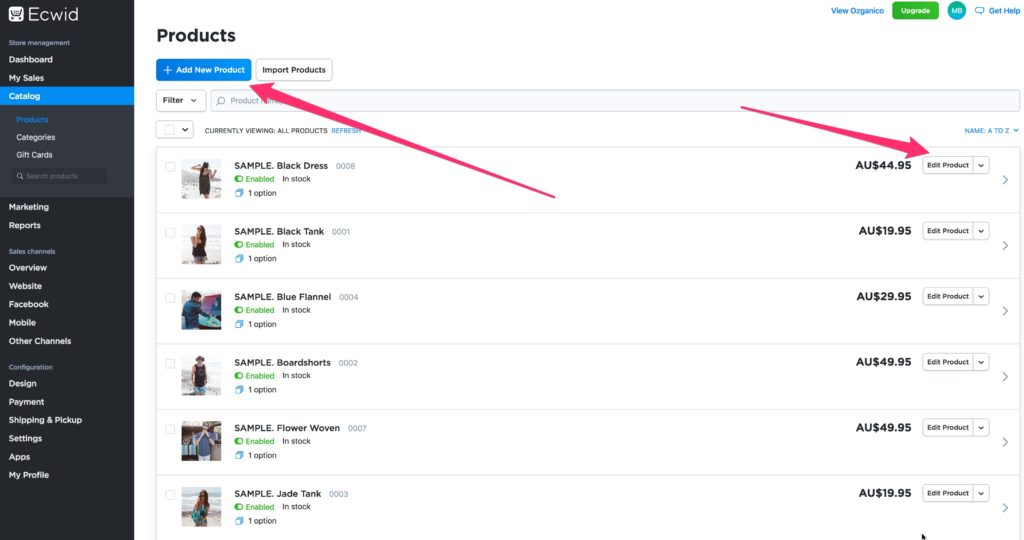
On this sample product you can see the simple Ecwid editor with a number of tabs available.
By default, you are shown the “General” tab which has most of your product options, such as:
- Name
- Description
- Images
- SKU
- Weight
- Price
- Availability
- Stock level (paid subscriptions only)
Go ahead and edit your product details here. Check out some of the other tabs as well to get a feel for the other options that are available. You might want to use some of those options right now, some of them are part of paid subscriptions only. However, none of them are essential to get up and running. As long as your General product settings are configured, you are good to get started and can work on the others later.
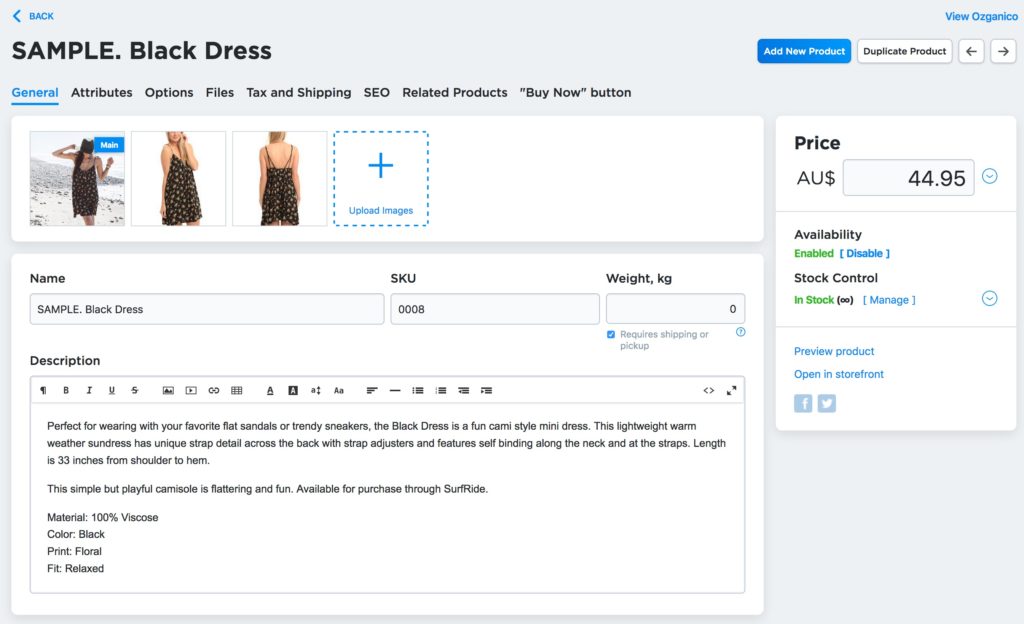
From the product catalogue screen, you can quickly jump into a product edit section, or delete a product by clicking the little drop-down arrow beside the “Edit Product” button. This will expand the edit choices and allow you to quickly jump straight into the appropriate screen to either :
- Edit options
- Edit attributes
- Add images
- Upload files
- Define taxes and shipping
Or to quickly duplicate or delete the product.

Make sure to delete all the sample products once you are finished with them and you are good to start selling on your new e-commerce website that didn’t cost you any money to build!
Add your legal pages
If you don’t have an existing site with your legal policies on it, I would recommend making sure you also put together your legal pages, in particular, your terms and conditions and privacy policy pages. Other important pages like your shipping and returns information are also important for your customers. You can start to sell without any of these pages, but they do help build trust and answer questions that your potential customers might have about some of your policies.
You might have already seen where these are when you were exploring your settings earlier.
In case you didn’t though, you can find them in the dashboard menu under “Settings” and then “General“. Within the general settings, click the “Legal Pages” tab.
From this screen you can click to enable all the relevant legal pages.
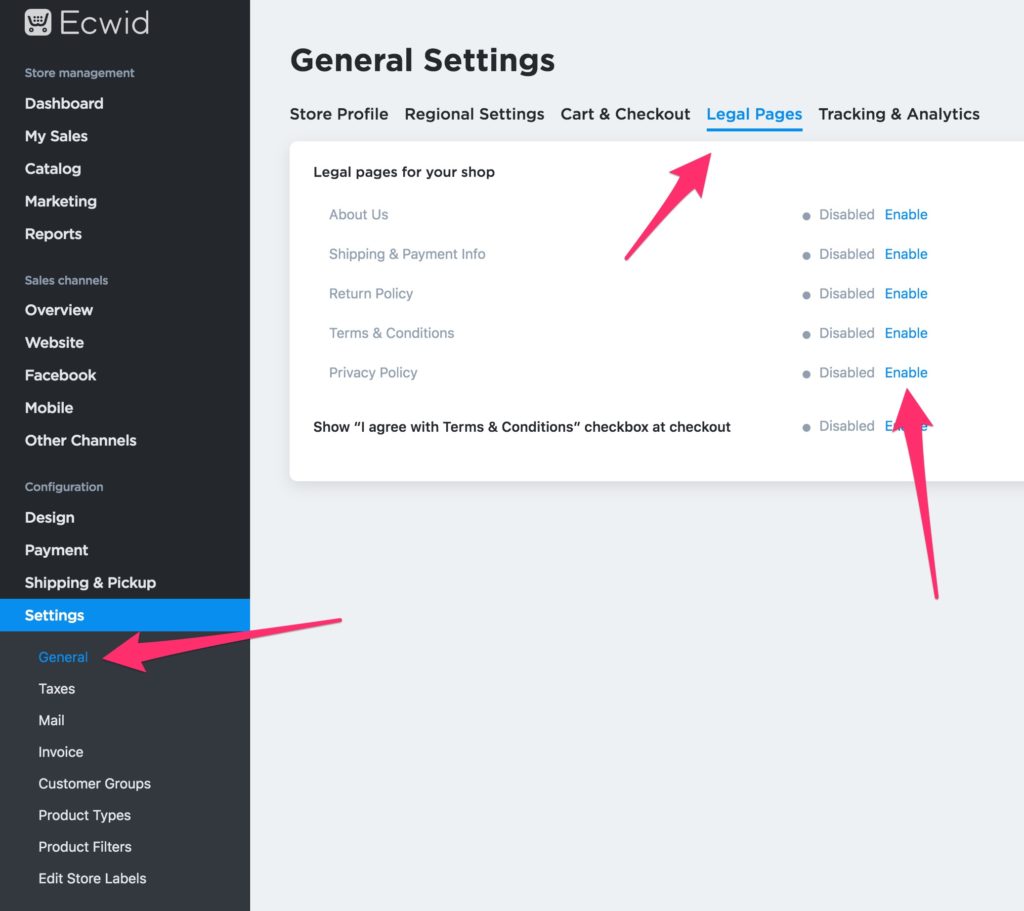
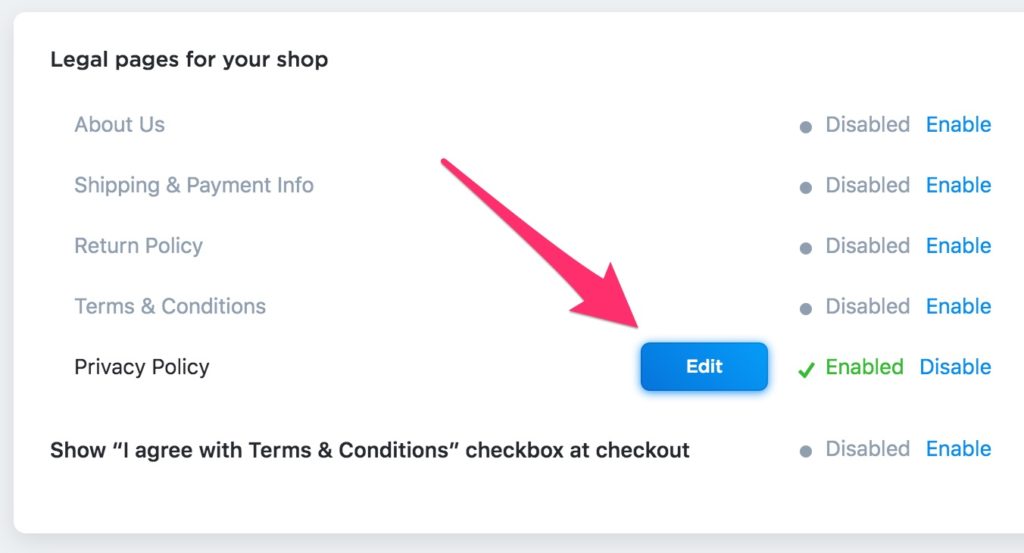
After you enable a page, an “Edit” button will appear beside it. Click that button to input your own information.
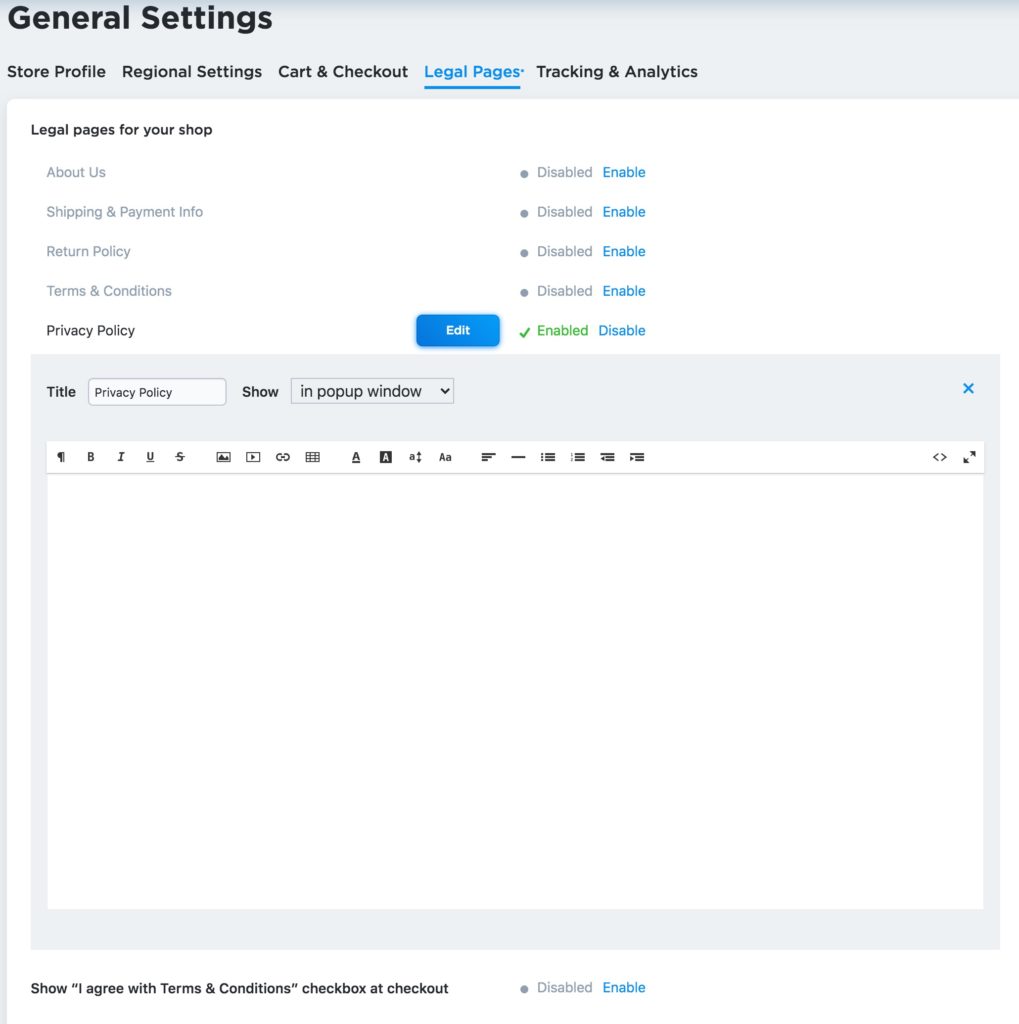
The editor will appear and you can configure what to call it (the title), whether to show it as a popup or as it’s own page, and of course put in your policy information.
If you need some help with what to put on these pages, we have a free privacy policy template available here.
Now, that’s all the basics covered.
Test your new Ecwid e-commerce website
Before you start sharing your new e-commerce website with everyone, I would recommend going to your website front-end and test everything, including placing a test order. Here’s a quick list of things to look for:
- All your branding is correct
- Your contact details are correct
- There are no more sample products
- Your legal pages are working
- You aren’t showing any of the sample testimonials or other sample content
- You can add products to the cart and proceed to the checkout
- Shipping is calculating as you expect it to
- Your payment options are available
- Your payment options are working
- Order emails are received
- See what new orders look like in the dashboard.
- Process a test order so you can see what happens when an order is shipped.
You just want to make sure that everything looks and works as expected and that you know what will happen when a customer places an order.
Once you are satisfied that you understand what happens, how everything works, and that everything is indeed looking and working correctly. You can start promoting your new Ecwid e-commerce website.
Get selling!
That’s it, now you can start promoting your new website. There are a lot of places you can promote for free, including Facebook, Pinterest, Instagram, Quora, Reddit, Twitter and more, but that’s for another article. Just be careful to abide by any rules related to any platforms you start promoting on. The last thing you want is to get banned!
That’s it! Get going, build your Ecwid store and start selling without spending any money.
Click here to sign up for a free Ecwid e-commerce store.
You might also be interested in:
- Ecwid vs WooCommerce: Which one is the best for small businesses?
- Ecwid Review: Is it the right e-commerce solution for you?
- How to accept pickup and takeaway orders for your restaurant with Ecwid
Find this article helpful? Pint it and help someone else out too!
